• Home
  • About me
  • Contact me
  • Crochet How To Links
  • Photo Tutorials
  • Patterns I Designed
  • Crochet For Kidneys
    • Part 1
    • Part 2
    • Part 3
    • Part 4
    • Part 5

crochetime

~ So many patterns, so much yarn, so little time: story of my hooky life.

crochetime

Category Archives: My crochet

Watch Me Crochet Wednesday

04 Wednesday Sep 2013

Posted by Natasja in My crochet, Video, Watch me crochet Wednesdays

≈ 5 Comments

Tags

crochet, crochet video, iMovie

This is nothing fancy; just a short video of me crocheting whatever I’m working on at the moment. I hope you like it.

This video shows me crocheting:

  • the second row of a chevron scarf,
  • in (US) half double crochet / (UK) half treble crochet,
  • with a 3.5 mm crochet hook,
  • using Vinnis Nikkim cotton in shade Natural

The video was taken on Saturday, late afternoon in my living room. I cut my finger, hence the green (embracing my inner child) band-aid. Not even a band-aid can stop me crocheting, I just adjust and adapt. That’s the way of the hooker.

Watch Me Crochet Wednesday

28 Wednesday Aug 2013

Posted by Natasja in My crochet, Video, Watch me crochet Wednesdays

≈ 8 Comments

Tags

crochet, crochet video, iMovie

Today is the first post in my new weekly series: Watch Me Crochet Wednesdays.

I’m not doing a fancy instructional crochet video; just a short video of me crocheting whatever I’m working on at the moment. I hope you like it.

This video shows me crocheting:

  • around a polystyrene sphere in an attempt to make a balloon*,
  • in (US) half double crochet / (UK) half treble crochet,
  • with a 6 mm crochet hook,
  • using Wendy Supreme Cotton Chunky in shade no 1420 (white).

The video was taken on the Bank Holiday Monday. We had amazing weather so I’m seated outside at the patio table, crocheting al fresco. On a sunny weekend it feels wrong to sit on the livingroom couch with my crochet. A slight breeze, warmth and the shade of our patio umbrella really gets my hooky vibes going. Do you like to crochet outside?

*The balloon one of three I have to make for a custom order I received on Etsy two weeks ago. I will share more about this interesting project later.

Lacy crochet coasters

15 Thursday Aug 2013

Posted by Natasja in My crochet, Pattern, Photo Tutorial

≈ 11 Comments

The very talented Caroline, blogger at Patchwork Harmony and editor of online publication 91 Magazine as well as freelance editor, writer & designer, published my pattern for these lacy crochet coasters on her blog today.  I’m very honoured to be one of her crafty guest bloggers – the woman won the Women in Publishing New Venture award 2012 for Pete’s sake!

lacy crochet coastersI can honestly say that I’ve never seen anything I’ve crocheted styled and photographed so beautifully. I think a Big Mac wrapper and loo roll will look beautiful if Caroline styled it for a photo shoot!

You will find more beautiful photos and the pattern for the square and round lacy crocheted coasters on her blog here.

Do have a look at the brilliant 91 Magazine. The magazine features news, style tips, shopping ideas, interiors, features on craft and vintage style and proudly supports small businesses, designers and crafts people. It’s unputdown(load)able.

The pattern is in the Ravelry database here. Please link your lacy coasters to the pattern so that Caroline and I can see what you made!

Granny Square In Bloom pattern

04 Sunday Aug 2013

Posted by Natasja in My crochet, Pattern, Photo Tutorial

≈ 17 Comments

Tags

crochet flower, crochet pattern, free crochet pattern

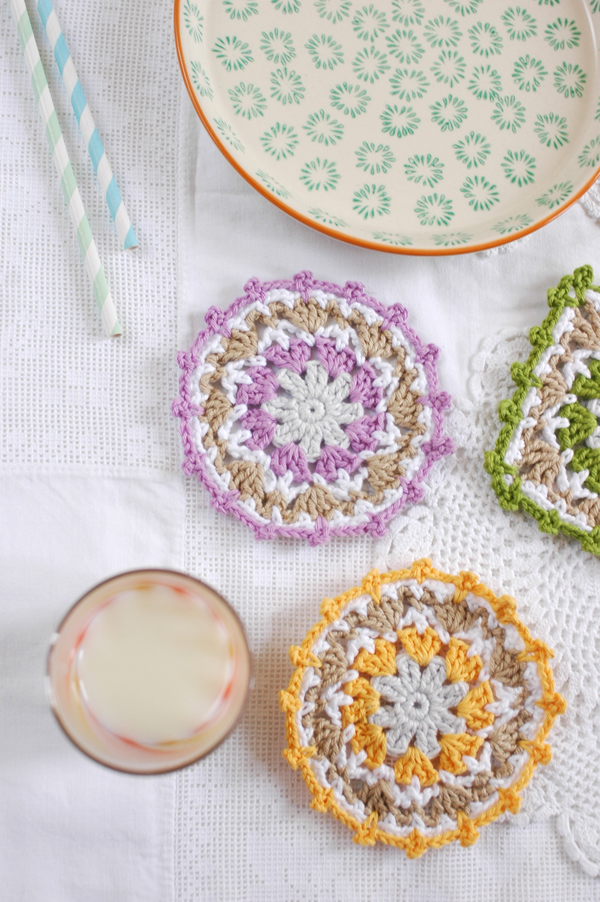
Here is the Granny Square in Bloom pattern, as used in Liezel’s cushion that I blogged about here.

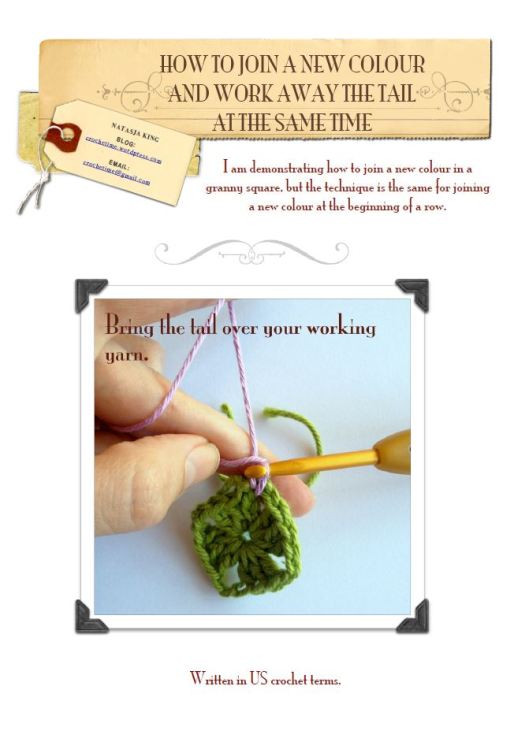
If you click on the picture, it will open as a PDF document which you can print. The PDF contains step by step photos. The pattern also appears on the Photo Tutorials tab of this blog.

granny square in bloomIf you don’t need step by step photos, here is the written pattern. I use US crochet terms*:

With colour A chain 5, slip stitch in first chain to form a ring.

Round 1: Chain 1, 8 SC in ring, slip stitch in chain. 8 SC

Round 2: Chain 1, 2 SC in each SC, slip stitch in chain. 16 SC. Fast off colour A.

Round 3: Join colour B. Chain 3 (count as DC.) *Popcorn stitch, 1 DC* Repeat from * to *. Join with slip stitch in chain. Fasten off colour B.

Round 4: Join colour C to any Popcorn stitch. Chain 1, 2 SC in same stitch. *Long SC in DC, 2 SC in Popcorn* Repeat from * to *.  Join with slip stitch in chain. 24 SC. Fasten off colour C.

Round 5: Join colour D to any Long SC. Chain 3 (count as DC). 8 DC in same stitch (9 DC shell made). *Skip 2 SC. 9 DC shell in Long SC.* Repeat from * to *. Join with slip stitch to chain. Fasten off colour D.

Round 6: Join colour E to SC of round 4. You will need to fold over the shells of round 5 in order to reach the SC of round 4. Chain 3 (count as DC). DC in same stitch. DC in next SC. *Chain 2, 2 DC, 1 DC*. Repeat from * to *. Join with slip stitch to chain.

Round 7: Chain 4 (count as DC plus 1 chain). *3 DC, 2 chain, 3DC* in chain 2 space of round 6. Corner shell made. 1 Chain. 3 DC in chain 2 space of round 6. Shell made. 1 Chain. Continue working *corner shell, 1 chain, shell, 1 chain* around in each 2 chain space of round 6. Join with slip stitch to chain.

Round 8: Continue working shells in chain 1 spaces and corner shells in chain 2 spaces around, each shell seperated by 1 chain.

I hope you enjoy making your Granny Square in Bloom squares. The pattern is in the Ravelry pattern database, so please link your projects so that I can see what you make!!

Granny square in bloom


*Shelley has translated the US crochet terms into UK / Australian terms over on her blog. You will find it here.

Granny Square In Bloom cushion

04 Sunday Aug 2013

Posted by Natasja in My crochet, My ramblings, Pattern, Ta-daah!

≈ 8 Comments

Tags

crochet, crochet cushion, crochet flower, free crochet pattern, granny square

You know that square motif I’ve been telling you about that had me so excited? Well, here it is. It’s called Granny Square In Bloom.

Granny Square in Bloom cushion.jpg

crochet flower granny square in bloom.jpg

I used the squares to make a cushion for my very good friend Liezel, as a birthday present (you can see her photography blog here).

She reads this blog and follows me on Instragram so I couldn’t post regular photo updates. I gave her the cushion yesterday which means I can finally reveal it to my lovely blog readers. The cushion was a huge hit! I’m so glad that I could make her happy with something handmade.

Liezel went home and took these photos of the cushion in it’s new home.

Liezel_Fourie Instagram crochet cushion collage.jpg

As you can see, she has a bird theme for the cushions on her bed. I wanted to stick to her theme, so I used three Red Robbin buttons. Aren’t they cute?!

red robin button.jpg

Nitty-gritty of the cushion:

  • Yarn: Stylecraft Cotton Classique in White, Rowan Handknit cotton in Ice Water, Raspberry, Linen and China Rose.
  • Crochet hook: 3.5 mm
  • Pattern for the front: Eight traditional granny squares of 4 rounds each in white, finished off with a row of SC. (Each of the four colours were used for two squares.)  Plus the eight 3-dimensional flower squares which are my own design. I call it Granny Square in Bloom squares. The pattern is available for free on the Photo Tutorials tab, in this blog post and also on Ravelry. I didn’t add a row of SC on the flower squares.
  • Pattern for the back: Traditional granny square of 19 rounds. Each colour round is seperated with two white rounds. I edged the granny square with SC in Linen.
  • Construction: The 16 squares which together forms the front, and the three side seams were sewed together with a slip stitch seam as described here on the Simply Crochet website. For the opening I slip stitch-joined up to the first shell on each side so that it would form neat corners.
  • Inner: Microfibre 16″ inner bought from Design-a-Cushions. Design-a-Cushions recommend purchasing an inner one inch bigger than your cover. I therefor made sure my covers were 15″ squared. Doing it this way gives you a perfect puffy cushion. I can highly recommend Design-a-Cushions. They are my favourite cushion inner supplier in the UK.
  • Red Robin Button: Natural Shell Zakka buttons that I bought on eBay from this seller.

crochet cushion seam.jpg

I thoroughly enjoyed designing the square, knowing that my friend will be the very first person to own something made in that design. Liezel, I hope you have the sweetest of dreams when you’re resting your pretty head on the cushion.

Lots of love

Jou maatjie, Natasja

Japanese V-neck ta-daaaah

29 Monday Jul 2013

Posted by Natasja in My crochet, Ta-daah!

≈ 24 Comments

Tags

crochet, Japanese crochet, wearable crochet

The V-neck top from a Japanese crochet pattern is finished! I’m wearing it today and I like it more and more with every hour that goes by. For it’s debut, I’m wearing it over a black vest, but I know it will look great over a longsleeved t-shirt as well.

Japanese crochet v-neck top

You probably notice the draping around the V of the neckline. Those folds are changing the whole time. It’s 14:30 now so I’ve been wearing the top for a couple of hours and it already looks softer. I used 100% cotton, so just like a denim jean, the longer I wear it and move around in it, the softer it becomes. This top is only going to get better!

I don’t always walk around like this, but I had to do it to show you the design more fully:

Japanese crochet v-neck top from back

I really, really, really, like my Japanese V-neck.  The only thing I don’t like, and feel I have to share with you in the spirit of full disclosure, is that the sleeves drop off my shoulders the moment I move my arms, and not in a sexy shoulder revealing way. Oh no. I completely lose a sleeve. Totally impractical, irritating and not pretty. My solution? Safety pins on each shoulder to pin the top to my vest.  As easy as that. (No way am I going to let hours of hard crocheting go to waste because of a minor wardrobe malfunction!)

Japanese crochet v-neck top

Nitty gritty of the V-neck:

  • Pattern: In Ravelry, the pattern is called #5 V-neck pullover. It’s designed by Eiko Matsumoto and published in Knit/Crochet With Ease – Seasonal Knits, also known as Easy Popular Knit and Crochet Wear. I bought the book on Etsy from Pomadour24. You can find the listing here.
  • Yarn: Patons 100% Cotton 4 Ply in Garnet, shade 1738. I used 4 and a quarter balls.
  • Crochet hook: 2.25mm
  • Modification: I made one modification: in stead of slipstitching the bottom 9 picots together to make the sides, I added another pattern repeat (but without the picots) to the bottom 12 picots on each side, thereby forming a very large armhole and widening the bottom of the top.  In the photo below you can see this modification. The side inserts don’t have picots on the bottom edge, and it also means that I don’t have a cute 3-picot grouping in the corners of my top because I used one of the three picots to kick off the rows of the side insert. No-one is going to notice the lack of picots in my sides, and it was more important to me to make the top fit around my hips, than sticking to the pattern.  A lot of ladies on Ravelry also had trouble with getting the top to fit around the hips. I could have added a third pattern repeat all around like they did, but that would have 1) made the top longer and 2) made the sleeves longer which would have added weight and pulled them down my shoulders even quicker than it does now. My solution was to do these side inserts – it fixed my problem, but without creating more problems.

Japanese crochet v-neck top side inserts

Wet blocking is highly recommended for this pattern. As with anything lacy it opens up the crochet stitches and gives the top shape. I can’t believe I’m saying this, or that I did it, but I pinned each picot seperately. There were hundreds! Looking at the top now, I’m very glad I did. Those picots on the arms and the bottom add the detail you need to round it all off.

Japanese crochet v-neck top

The Easy Popular Knit and Crochet Wear book is full of the most beautiful Japanese crochet patterns. This is my second top from the book. Out of the two, I like this one the most. I already have my eye on a waterfall cardigan. I’ll even use the same Patons 4 ply cotton yarn.

I think as a rule Japanese patterns are quite boxy and straight up-and-down. This means they are easy to make because they consist of repeating motifs or they’re basically just one big rectangle (like this one), so us ladies with a more womanly shape, need to make modifications. That, or just embrace the floaty, square shapes. Floaty tops can work well when paired with a tight-fitting top underneath and balanced out with a straight / slim leg trouser. (Oooh, check me out – giving fashion advice! Hahahaha.)

One last thought: I love this V-neck top, I loved being challenged by the crochet diagram, I loved using Patons cotton 4-ply and most of all, I love that wearing this V-neck top makes me feel unique and a tiny bit special.

Still Going Japanese

05 Friday Jul 2013

Posted by Natasja in My crochet, My ramblings

≈ 9 Comments

Tags

Japanese crochet, wearable crochet

20130705-123621.jpg

In between working on photo tutorials and designing motifs I’ve been hooking away on my Japanese V-neck. The one on the cover of this book.

I really do love this and can’t wait for it to be finished.

Terrific Tuesday

02 Tuesday Jul 2013

Posted by Natasja in My crochet, Terrific Tuesdays

≈ 4 Comments

On a Monday I can still remember the fun I had over the weekend, Wednesday is the middle of the work week, on Thursday I start getting hopeful and on a Friday I can taste the weekend. But what about a Tuesday? It’s so…. just there. Weekend memories are too far away and the upcoming weekend might as well be a year away.

What we need is a bit of colourful inspiration to get us going on a Tuesday, don’t you think? A pretty picture, beautiful scenery or colourful imagery. Yup, that’ll liven up Tuesdays and turn it into a terrific day!

From now on I will go through my photos and Pinterest likes every Tuesday and find us a pretty picture to add colour and joy to the day.

xxxxxx

20130627-080914.jpg
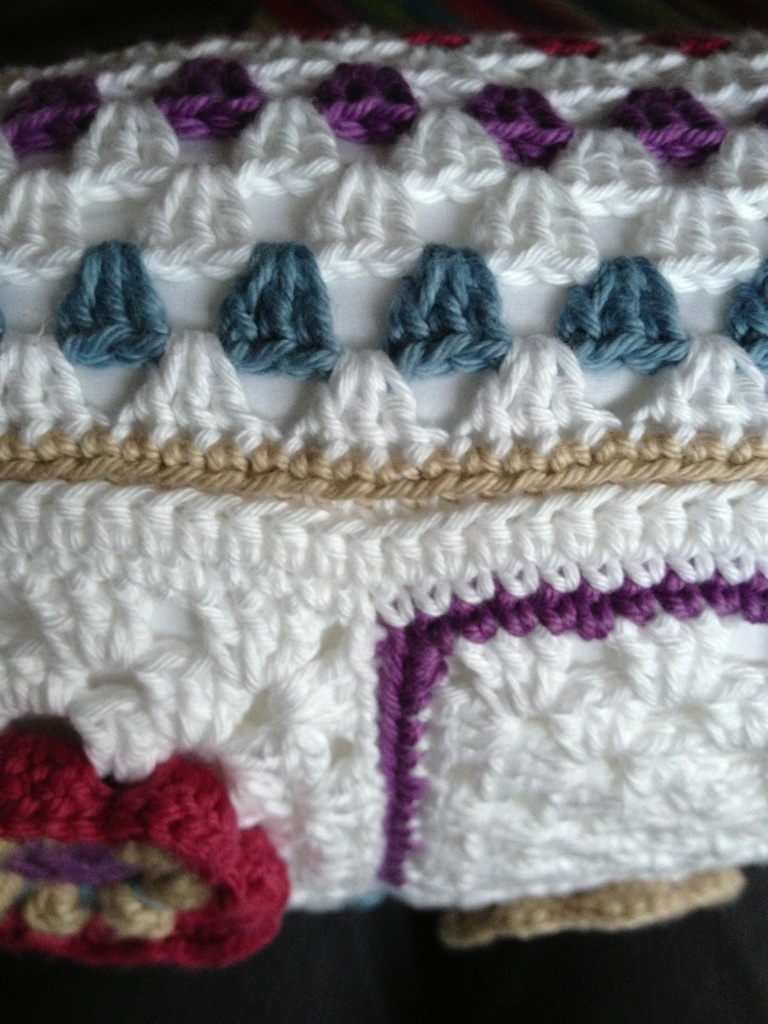
I’ve been designing crochet motifs. This one is a work in progress for a guest blog I’ll be doing in July / August. It’s so much fun playing, trying something, writing it down, redoing it, changing my mind, changing the colour and playing some more. I have to say I’m kinda proud of myself for designing something from scratch. I didn’t even refer to a stitch guide or pattern book – the stitch choices and design sort of “flow” out of me and I just go with it.

Wishing you all a Terrific Tuesday.

Natasja

How make a multicoloured, traditional granny square

17 Monday Jun 2013

Posted by Natasja in My crochet, Photo Tutorial

≈ 10 Comments

Tags

crochet, crochet instructions, granny square, photo tutorial

Last week I showed you how to make a single colour granny square. Today I’ll show you how to crochet a multicoloured, traditional granny square.

This is probably what you think of when you think “granny square”.  If you’ve seen granny square blankets on shows like The Big Bang Theory or the Roseanne show, this photo tutorial will show you how to make one in the same style. I’ve blogged about those famous granny square blankets here and here. If you want to make those blankets, just use black as your final round and be as bright as you like with the other rounds.

Multi colour granny square tutorial

As for the green bunny in the photo…. I just couldn’t resist. His fur matched the centre of my granny square so perfectly, he was just begging to be on the cover!

You can hop on over (see what I did there?) to the Photo Tutorials page here, or click on the photo above to download the pdf photo tutorial.

How to join a new colour and weave away the yarn tail at the same time

14 Friday Jun 2013

Posted by Natasja in My crochet, Photo Tutorial

≈ 3 Comments

Tags

crochet, crochet instructions, photo tutorial

The title of this blog post is quite a mouthful isn’t it? But if you’re a crocheter, I bet you anything you would have asked this question a few times.

To crochet is lovely, but to weave in tail ends not so much. If you’re making a granny square blanket for instance, you’ll have two tail ends per colour, per granny square to weave away. Most granny squares are at least 5 rounds, so that’s 10 ends per granny square! Weaving in those ends quickly adds up to One Massive Job. I know of quite a few crocheters who haven’t finished a project just because the weaving in of ends seem too daunting.

In this photo tutorial I show you how to work away a tail end, as you crochet. If you do this, you’ll only have one tail end (the one that you create when you finish off and cut the yarn) to weave away. That’s one half of The Weaving Away Job done!

As I say on the cover of the photo tutorial, I am demonstrating the technique with a granny square, but the technique can be used for joining a new colour in a row as well.

Join a new colour and work away tail end

The tutorial is available to view on the Photo Tutorials page here, and clicking on the photo above will take you there too.

← Older posts
Newer posts →

Enter your email address to follow this blog and receive notifications of new posts by email.

Join 2,406 other subscribers
Follow crochetime on WordPress.com

Follow on Bloglovin’

Social

  • View NatasjaKing’s profile on Instagram
  • View Natasja King’s profile on Pinterest

The eBook I wrote

Recent Posts

  • Edward’s Crochet Imaginarium and two pink monsters
  • Review of How To Crochet book by Mollie Makes
  • Buttercup knit and crochet cardigan
  • Kimono Cardigan
  • The Sky is the limit

Categories

As seen on TV Book reviews CAL Camping Crochet For Kidneys Etsy Etsy seller interviews Folksy GIF In the press Knitting Markets My book My crochet My knitting My ramblings Other people's crochet Part 1 Part 2 Part 3 Part 4 Pattern Photo Tutorial Positive Thinking Ta-daah! Terrific Tuesdays Video Watch me crochet Wednesdays Yarnbombing

Instagram

No Instagram images were found.

My designer profile

Blog at WordPress.com.

Privacy & Cookies: This site uses cookies. By continuing to use this website, you agree to their use.
To find out more, including how to control cookies, see here: Cookie Policy
  • Subscribe Subscribed
    • crochetime
    • Join 718 other subscribers
    • Already have a WordPress.com account? Log in now.
    • crochetime
    • Subscribe Subscribed
    • Sign up
    • Log in
    • Report this content
    • View site in Reader
    • Manage subscriptions
    • Collapse this bar
 

Loading Comments...