• Home
  • About me
  • Contact me
  • Crochet How To Links
  • Photo Tutorials
  • Patterns I Designed
  • Crochet For Kidneys
    • Part 1
    • Part 2
    • Part 3
    • Part 4
    • Part 5

crochetime

~ So many patterns, so much yarn, so little time: story of my hooky life.

crochetime

Category Archives: Pattern

Kimono Cardigan

09 Saturday Jan 2016

Posted by Natasja in My crochet, My knitting, Pattern, Ta-daah!

≈ 3 Comments

Do you have a yarn that you love so much that you will search months and months on end for a pattern just so that you can use this yarn? A yarn so soft and light, yet warm in the cold and cool in the heat? A yarn in the perfect shade of grey that will match almost everything in your wardrobe? I have.  It’s Gardnstudio Drops BabyAlpaca Silk in 8465 Medium Grey.

I bought 12 balls back in August 2015 without knowing what I wanted to make with it. That’s unusual for me because I always find the pattern first and then look for the yarn. I thought I found the perfect crochet pattern in the Samira sweater, and I got halfway through the back when I realised this wasn’t working. The back loop only SC was creating a fabric with so little stretch, I would have had to modify the pattern so much and buy more yarn, that I just frogged it. You can see the frogged project in my Ravelry Projects here.

The fantastic Drops pattern database also didn’t have anything suitable for Babyalpaca Silk that I particularly liked.

What to do now?

I just made up my own pattern. And it’s mostly a knitted pattern.

I used Babyalpaca Silk for my Whispers cardigan which is crocheted, so this time I wanted to see and feel how the yarn looks knitted. I’m so happy I did it this way – this yarn looks better knitted than crocheted I think.

As for a pattern, well it needed to be super easy because I’m no good at shaping for knitting and especially not if I have to dream up the pattern myself!  Straight sides were what I needed. That made me think of a kimono because isn’t that really just a bunch of squares and rectangles? Surely I could manage that.

Turns out a kimono is exactly that: squares and rectangles. I used the plus size DIY Kimono pattern of Nina Scott-Stoddard, as my guide for the pattern pieces.

But, me being me, I couldn’t just knit a cardigan. No I needed something crocheted for a bit of flair. That’s were the the “Zen lattice” pattern from Robyn Chachua’s book Crochet Stitches Visual Encyclopedia came in. It was the perfect type of lace stitch and also perfectly name – Zen. Zen crochet border for a knitted kimono cardigan. I mean really! Match made in Japan.

I also added two rows of SC in a contrasting colour before I started the knitted section. Just because I can.

Below is the “pattern” for my Knitted and Crocheted Kimono Cardigan. I’m saying “pattern” because it’s really just a loose record of what I did. Not technical at all. I’m sure many knitters out there would be able to do a much better job of this than me, but I’m giving you the “pattern” so you can use it as a starting point.

I’m using US crochet terms.

Back

Working from the bottom up you start with the crochet border. Chain 114  (14 x 8 + 2)  with 3 mm crochet hook.

Row 1: SC.

Now follow rows 1 – 12 of Zen lattice from Crochet Stitches Visual Encyclopedia. In the last row, make 3-chain in stead of 5-chain.

Row 14 and 15: change to new colour and make 2 rows SC 2. Cast off.

Start of knitted section:

Use 3 mm knitting needles to pick up stitches through front loop of crochet. (This was the only way I could work out to switch from crochet to knitting. I picked up the stitches with the same size knitting needle as my crochet, and then used a bigger size knitting needles to knit the first row.)

With 4.5 mm knitting needles, start the stockinette stich by knitting the first row, then purl the second row. Continue in in stockinette stitch until desired length.

Front panels

Follow the same instructions as for Back, but cast on 58 stitches (7 x 8 + 3).

Sleeves

Follow the same instructions as for Back, but chain 92 (11 x 8 + 3).

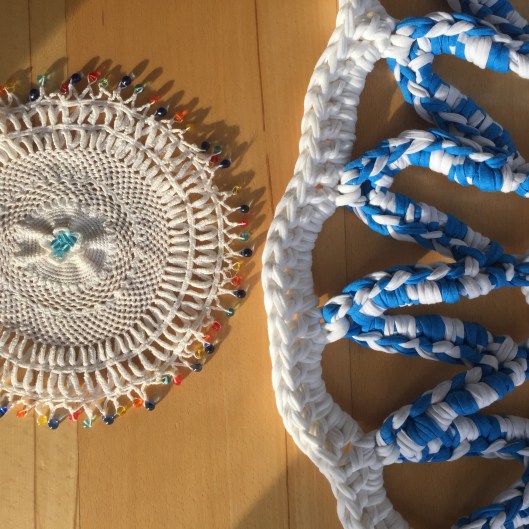
It’s crucial that you block the pieces before sewing them together. In the photo above you see how the Zen lattice looks before blocking. You can’t even make out that it’s crochet! Below you see the lattice stretched out to it’s full potential. The KnitPro t-pins were real life savers for the blocking.

I have to warn you though that when I started wearing the kimono cardigan those crochet borders lost their “openness”, so don’t rely on the crochet to add length to the cardigan – it will jump back to almost pre-blocking width. If I knew this, I would have made my knitting much longer.

As for sewing up the knitting, I can’t get over how amazing the mattress stitch is for this. It really creates an invisible seam. This video is what I used to see how to make the mattress stitch and how to sew in the knitted sleeves.

I love wearing my super soft kimono cardigan, but I do know I could have made a better job of it by 1) creating shaping for the neck and shoulders in the back and 2) by making the body longer. Because of the short boxy shape I also have to think a bit about what I wear it with because it can look very unflattering if you don’t have the right layers underneath.

The yarn is this kimono cardigan’s saving grace – it’s so perfect that I don’t even mind having to think a bit harder about what I wear with the cardigan. I’ll even go clothes shopping to find the perfect thing to make this kimono cardigan look its best. I want to wear my kimono cardigan every day!

Kimono cardigan 02
Kimono cardigan 05
Kimono cardigan 01


Iznik crochet cushion with beads

30 Thursday Jul 2015

Posted by Natasja in In the press, My crochet, My ramblings, Pattern

≈ 7 Comments

Tags

beaded crochet, crochet cushion, Inside crochet

Other people have goals like climbing Mount Everest, seeing the world or being CEO of a big company. Me? I wanted to have a pattern published in a UK crochet magazine and today I can tell you that I achieved my goal. Consider Everest climbed, the world seen and business cards printed – issue 68 of Inside Crochet magazine holds a pattern which I designed: the Iznik crochet cushion.

iznik crochet cushion

It was during a visit in June 2014 to the V&A Museum that I first saw the pottery made in the Turkish town, Iznik, and the geometric & floral designs of the tiles in the Turkish and other Islamic mosques. I fell in love with the dark blue, turquoise, sage green and highlights of red used by the craftsmen more then 500 years ago. Ever since that visit to the V&A Museum I wanted to make something that would at least incorporate the four main colours of Iznik pottery, but ideally also be geometric and/or floral.

Iznik tiles
Iznik tiles
Tile detail. Turkey 1580. Exhibited at the V&A Museum, London
Mihrab in Rüstem Pasha Mosque. Photo credit: DSC04142 Istanbul - R stem Pasha camii - Foto G. Dall'Orto 26-5-2006.
Mihrab in Rüstem Pasha Mosque. Photo credit: DSC04142 Istanbul – R stem Pasha camii – Foto G. Dall’Orto 26-5-2006.

When I received the Inside Crochet email for pattern submissions and saw that issue 68 was themed around adventure and travel I knew this was the perfect opportunity to crochet that Iznik inspired piece – and achieve my goal of having a pattern published in an UK magazine.

Iznik Cushion Flying colours page

I designed the cushion so that the white joins between the squares could represent the tile grout and by crocheting squares, but dividing them into two coloured triangles, I reference the tile inspiration and create an intricate geometric design all one. In Iznik pottery the main colours are turquoise and dark blue. Sage green was introduced later and red even later still so my colour scheme reflects this.

I imagined that my red beads are like tiny flowers which sparkle when the sun rays catch them. The red glass beads are my favourite part of the cushion. I liked them so much I even used them for the back.

In the pattern I describe how to make the BDC (beaded double crochet) stitch and how to thread your seed beads onto the yarn before you start crocheting. In fact, Nicky Hale also designed a cushion for this issue using beads (it’s the beautifully bright zig zag bolster next to my cushion in the photo above) and the editors thought it a good idea for her pattern to have a reference to my pattern for the instructions on how to thread seed beads onto yarn.

Still not sure how to thread seed beads onto yarn? Fear not. As part of the iBook I wrote, Crochet Pretty, I made a video to show my readers exactly how to thread those seed beads which I will share with you now.

Here is the video that shows you exactly how to thread seed beads onto yarn:

See, it’s very easy. Once you’ve crocheted with beads you’re not going to want to stop. It’s such a fun and effective way of adding a little something special to your work.

Inside Crochet issue 68 will be available in stores from 30 July and as a digital download here.

If you decide to make the Iznik cushion, I would love to hear from you! Inside Crochet has listed the pattern on Ravelry so you can link your project. Just follow this link to the Ravelry project page.

A modern take on a family heirloom

12 Tuesday May 2015

Posted by Natasja in My crochet, Pattern

≈ 9 Comments

Tags

crochet, doilies, doily, t-shirt yarn

My great-grandmother, Aggie Esterhuizen, was an amazing lady. I was 11 when she passed away at the age of 92.  She was a seamstress who made wedding dresses for all and sundry in Cape Town. My Mom told me she remembers Aggie laying out the huge pieces of white fabric on the floor and cutting the pieces for the wedding dresses without any pattern. I wish I could have seen that!

My few memories of her talent, is the tin of colourful buttons in her room and the white Anchor crochet thread me and my grandmother had to buy for her at OK Bazaars. My only memory of her actually crocheting is me sitting on the floor next to her chair while she crocheted a light yellow blanket with the blanket over her legs. It was  just so fascinating to me to see the blanket growing with a slight twist of her wrist and a crochet hook.

I’m absolutely convinced that Aggie influenced my love of crochet without me even knowing it. Just because I can only remember her crocheting one yellow blanket, doesn’t mean my tiny mind didn’t take in more than that, and I love her for that!

Just like she made wedding dresses without a pattern, she also crocheted without a pattern. When I was in Cape Town at the beginning of the year I spotted a beautifully made, intricate doily in the side board of my mom’s dining room. I just had to have it. Mom told me Aggie crocheted it without a pattern using the white Anchor crochet thread from OK Bazaars that I remember so well.  I’m not even sorry to say, but I just wouldn’t let that doily go – it just HAD to come back home to me. I wanted that little piece of Aggie as a reminder of her crochet talent that was passed down to me, to be in my home.

More than that, I want to give credit to my great-grandmother and her talents. She passed away before the internet, blogging or Instagram and here I am with access to all these things and a readership from all over the world – I decided I would write out Aggie’s doily pattern and make it available for free on my blog so that all can appreciate Aggie’s talents.

If you’ve been following the blog you would know that John and I recently moved into a new apartment. One of the big luxuries of this new apartment is that I have my very own bathroom. (Technically it’s the “family bathroom”, but we also have an en suite which John uses, so “family” became “Natasja”.) I can decorate my bathroom with as many girly things as I like, which is just fantastic! I love the t-shirt yarn doily style bathroom mats that I’ve been seeing on Pinterest, Ravelry and Facebook groups but I could never make one as it’s too girly for John.

Now that I have my own bathroom and a doilie from my great-grandmother, the obvious answer was to remake Aggie’s doily into a t-shirt yarn bathroom mat!

crochet bathroom mat

I love the huge loops around the edges of Aggie’s doily. They look just as good exaggerated with t-shirt yarn.

Aggie, I hope you like my version of your doilie. I didn’t do two rounds of the big loopy bits and I left out the beads. Two round of loops would have made the rug too big and the beads are impractical for a floor rug. From one hooker to another, I’m sure you’ll understand.

IMG_2388
doilie and t-shirt yarn rug
IMG_2384

Aggie’s doily rug

Materials:

1 cone white Hoooked Zpagetti

1 cone blue mix Hoooked Zpagetti

12 mm crochet hook

Pattern:

With White chain 4 and join with sl st to first ch to form a ring.

Round 1: 1ch, 6sc in ring – 6 sts
Round 2: 1ch, 2sc in each st – 12 sts
Round 3: 1ch, *2sc, 1sc. Repeat from * to end – 18 sts
Round 4: 1ch, *2sc, 1sc, 1sc. Repeat from * to end – 24 sts. Fasten off White.
Round 5: Join Blue Mix to any sc. 3ch, 2dctog in same sc, skip 1sc, *3ch, 3dctog. Repeat from * to end. Ss to first ch. Fasten off Blue Mix.
Round 6: Join White. 4ch, 1sc in ch space. Repeat to second to last ch space. Ch2, 1dc in ch space.
Round 7: 5ch, 1sc in ch space. Sl st into dc.
Round 8: 5ch, 1hdc in ch space. Repeat to second to last ch space. Ch2, 1dc in ch space. Fasten off White.
Round 9: Join Blue Mix to any ch sp. 3ch (count as dc), 5dc in ch space, 1ch, *6dc in next ch sp, 1ch. Repeat from * to end. Sl st into top of 3ch – 84 dc. Fasten off Blue Mix.
Round 10: Join White. 7ch (count as hdc plus 5ch), *skip 2dc, hdc, 5ch. Repeat from * 25 times. Ch3, hdc into 2nd ch of starting chain.
Round 11: 5ch, hdc into ch space. Repeat 26 times. Ch3, hdc in hdc of previous round.
Round 12: 6ch, hdc in ch5 space. Repeat 26 times. Ch6, sl st into top of hdc. Fasten off White.
Round 13: Join Blue Mix to any ch6 space. 15ch, 1sc into ch space. Repeat 27 times. Sl st into first ch.
Round 14: 1ch, *7sc, 3ch, 7sc in ch space. Repeat from * to end. Fasten off Blue Mix.
Round 15: Join White to ch space. 1ch, *sc, 7ch, sc in ch space. Repeat from * to end. Sl st to first sc.
Round 16: 3ch (count as dc), 5dc in ch space, 1dc in sc, *6dc in ch space, 1dc in sc. Repeat from * to end. Sl st. to top of starting chain. Fasten off.

I don’t think Aggie could in her wildest dreams have imagined her dainty doily would be the inspiration behind a bathroom mat made with cut-offs from t-shirt fabric. “Goeie genugtig my kind!”

She also would never have dreamed of her doily pattern being made available to thousands of people from all around the globe though a thing called a blog 27 years after her death, by a great-granddaughter living in England. “Wat de dôner my kind!”

doilie and doily rug

But Aggie was up for anything and a very talented lady so I recon she would have been the first to grab a 12 mm crochet hook to design an even bigger and better rug. Then she would have started her own blog.

Peppy Blossom Bunting in I Like Crochet magazine

02 Saturday May 2015

Posted by Natasja in In the press, My crochet, Pattern

≈ 2 Comments

Tags

bunting, crochet, I Like Crochet magazine

The latest issue of I Like Crochet electronic magazine is out now and it’s all about Summer. It’s difficult to imagine sunshine and warm weather when the temperature for the first official day of Spring in the UK was a mere 12 degrees, with heavy rain predicted for the Bank Holiday on Monday! Come rain, clouds or icy winds, the June issue with the bright colours and Summer themed designs, like the cute tote bag on the cover, is bound to get you in a Summer mood – or at least in the mood to bake a lemon meringue tart. A taste of Summer is just as good as the heat of Summer, right?

June issue

I’m also very happy to say that my Peppy Blossom Bunting is in this issue, helping you welcome in Summer.

Blossom bunting flag

The bunting is very colourful and not your average bunting – with the bright flower centre it just screams happiness.

Bunting is a great way to decorate any space, and this Peppy Blossom Bunting is the easiest way to add a vivid pop of color to your décor. Perfect for any summer party or gathering, you can easily add more or less flags to create just the size you’re after.

I love the styling of the bunting with the glass containers of colourful sweets.

Blossom bunting

Just like in the April issue when my clutch bags were used as the introductory page for the Springtime Accessories, the Preppy Blossom Bunting is the introductory photo for all the Household Trinkets in the table of contents! What a great compliment!

table of contents june i like crochet magazine

Do you see all the great patterns in this issue? It’s chock full! Two of my favourite patterns are the Deep Cut Moss Vest and the Vivid Coral Reef Top. The Deep Cut Moss Vest is for the advanced crocheter and uses Tunisian crochet and the Vivid Coral Reef Top is nice and easy, but so striking.

Vivid-Coral-Reef-Top
Deep-Cut-Moss-Vest

These patterns, and 29 others are available to subscribers only. A subscription to I Like Crochet include six issues annually, with each issue delivering at least 30 projects and 7 tutorials, for a total of 190 projects and 42 tutorials during the year. Subscription is available for website only, tablet only or for the greatest value and convenience, combine website access to with a tablet magazine subscription.

My crochet clutch bags in I Like Crochet magazine

04 Wednesday Mar 2015

Posted by Natasja in In the press, My crochet, Pattern

≈ 6 Comments

Tags

crochet, crochet accessories, crochet clutch bag, I Like Crochet magazine

It’s March, which means Spring for us in the Northern Hemisphere. Yeah! Everywhere I’m seeing daffodils, the sky is blue and the days are noticeably longer. Triple Yeah! The Spring issue of the electronic magazine, I Like Crochet  is also available for download today.  Don’t you just love the very Spring-y cover of the April 2015 issue? I Like Crochet April 2015 coverThere are more than 30 patterns in this issue. Check out the Table of Contents here. I’m especially excited to tell you about this month’s I Like Crochet e-magazine because my Vintage Granny clutch bags appear in this issue! The bags were also chosen to be the introductory photo for all the Spring Accessories! I’m so happy!!! Springtime accessories cover Two of the other projects in this issue that I really like are the Retro Flower Cushion by Jo Bodley and Easy Homemade Organizers by Pauline Fitzpatrick. The organizers are definitely on my to do list! I especially love the grey one. Jo’s cushion is truly something different. It’s lovely to see a crochet cushion this artsy and unique.

Retro Flower Cushion
Easy Homemade Organizers

These patterns, and 27 more, are available to subscribers only. A subscription to I Like Crochet include six issues annually, with each issue delivering 30 projects and 7 tutorials, for a total of 190 projects and 42 tutorials during the year. Subscription is available for website only, tablet only or for the greatest value and convenience, combine website access to with a tablet magazine subscription.

I’m very grateful to I Like Crochet for publishing my clutch bag patterns. It’s a great electronic magazine with beautiful photography, which I’m proud to be associated with. If you have bought this issue, and especially if you make one of my Vintage Granny clutches, I’d love to hear from you!

Free pattern for a Christmas Tree Ring

14 Friday Nov 2014

Posted by Natasja in My crochet, Pattern, Ta-daah!

≈ 14 Comments

Tags

Christmas, christmas crochet, crochet jewellery, free crochet pattern

It’s almost Christmas (shock, horror) so I decided to design a free Christmas crochet pattern for all my lovely readers, Facebook followers and Instagram followers.

Christmas tree crochet ring

Christmas tree crochet ring

The christmas tree ring is a cute accessory to wear on Christmas day, it’s a great stocking filler, or wear it throughout December to spread the Christmas cheer every day.

crochet thread crochet christmas tree

I use crochet thread for this ring. Please don’t be afraid of using crochet thread and the required 1.5 mm crochet hook. I used crochet thread for two of the projects in Crochet Pretty. Out of all the patterns in Crochet Pretty, the Oh What A Cute Oval Brooch is my favourite and that’s all down to the use of crochet thread for tiny flowers and picots. I’m falling in love with crochet thread more every day.

We are spoilt with choice when it comes to yarn weights and most of the time we go for the double knits or 4 plies, but crochet thread is made for us! Literally! Making something with thin yarn and a tiny crochet hook is just like regular crochet, you just need to look a bit closer when you’re crocheting. That’s all there is to it.

crochet thread crochet christmas tree with seed beads

Hopefully this tiny crochet christmas tree will give you the confidence to also use crochet thread more and see the 1.5 mm crochet hook as your friend.

crochet thread seed beads ring blank

You will need

1.5 mm crochet hook

Anchor Freccia ticket no. 6 in green

Ring blanks like this one sold at Hobbycraft

Clear super glue or use a mini glue gun

5 x size 8 red seed beads. I bought this pack of mixed colours at Hobbycraft and just picked out the red beads.

Notes and abbreviations

This pattern is written in US crochet terms. The sc (single crochet) in this pattern is the equivalent of a dc (double crochet) in UK crochet terms.

Bsc is a Beaded Single Crochet. You make a beaded crochet stitch by moving the bead up against your crochet before doing the last “yarn over” of the stitch. Watch this video to see how to make a beaded treble – the technique is the same no matter what crochet stitch you use.

Beads have to be threaded onto the yarn before you begin crocheting. Watch this video to see how to thread the beads onto yarn.

Turn your work after every row.

ch = chain

sc = single crochet

bsc = beaded single crochet

st = stitch

Pattern

Thread 6 seed beads onto yarn.

Foundation row: Work 2 chains.

Row 1: 1 sc into second ch.

Row 2: 1 ch, (1 sc, 1bsc, 1 sc) into next st. (3 st.)

Row 3: 1 ch, sc in each st to end. (3 st.)

Row 4: 1 ch, (1 sc, 1 bsc) into next st, 1 sc, 2 sc in next st. (5 st.)

Row 5: 1 ch, 1 sc in each st to end. (5 st.)

Row 6: 1 ch, 2 sc in first st, 1 sc, 1 bsc, 1 sc, 2 sc in last st. (7 st.)

Row 7: 1 ch, 1 sc in each st to end. (7 st)

Row 8: 1 ch, (1 sc, 1 bsc) into next st, 4 sc, 1 bsc, 2 sc in last st. (9 st)

Row 9: 1 ch, 1 sc in each st to end. (9 st)

Row 10: 1 ch, 4 sc, 1 bsc, 4 sc (9 st)

Row 11: 1 ch, 3 sl st, 1 ch, 3 sc (last 3 st remain unworked). (3 sc)

Row 12: 1 ch, 3 sc. (3 sc)

Fasten off and weave away the ends.

Glue the christmas tree to the ring blank.

xxxxxx

Christmas tree crochet ring

Crochet Pretty is now available in iBooks

10 Monday Nov 2014

Posted by Natasja in My book, My crochet, Pattern

≈ 6 Comments

Tags

crochet, crochet book, crochet ibook, crochet pattern, iBook, ipad, self publishing

Crochet Pretty book cover

This is my crochet ebook! I am so, so, so excited to say that I’ve published a crochet book and it’s ready for you to buy for £4.99 / $7.99 over in the Apple iBooks store!!! Just click here.

The ten accessories that I designed for this book are the drawstring pouch that you see on the cover, a pair of beaded earrings, two pairs of wrist warmers, a scarf, a wrap, flowery ring, necklace, brooch and a headband. The accessories are really pretty, colourful and easy to make.

Crochet Pretty iBook projects on chair

I loved every minute of writing this book. Everything about it was amazing, thrilling, exciting and so rewarding. It’s such a blessing to be alive in the 21st century where you can publish your own books, and not just any book, a book with five instructional videos, and an interactive quiz built in!

Unfortunately Apple are the only ebook publishers who support such an interactive book, so Crochet Pretty is only available on iPad and Mac. (You won’t be able to purchase Crochet Pretty on Amazon for instance.)

If you are as excited as I am and want to buy my iBook, you have to hop on over to this page on iTunes. If you already have iBooks installed on your iPad, just go ahead and click on the link.

If you don’t have iBooks installed yet, follow these steps to buy Crochet Pretty:

1. Download the iBooks app from the App store for free.

2. Once it’s downloaded tap the “Store” button in the top left corner of the iBooks app.

3. Search for Crochet Pretty in the top-right corner search box.

4. When you tap on the book title you will see screenshots of the book and you can download a sample of the book. Do this by tapping the “Get Sample” button.

5. When you are ready to purchase the book, tap the price. The button will turn green and read “Buy Book”. Tap it again to purchase the book with your iTunes account and password.

6. Crochet Pretty will start to download as soon as you’ve entered your iTunes account password. Once it’s finished, it will appear as a title on our bookshelf in the iBook app.

These screenshots give you an idea of what to expect from the book.

Zig Zag Wrist Warmers

Zig Zag Wrist Warmers

Beadazzling Earrings

Beadazzling Earrings

Basket of yarn in crochet pretty ibook

The first “page” of the book is a short video to show readers how to navigate through my book. Crochet Pretty is a different kind of book with features that not everyone would be familiar with, so I thought I needed to show off those features a bit. Luckily the video isn’t just inside the book – I uploaded it to YouTube too, so everyone can watch it. In the video you see the first three patterns of the book – it’s a nice sneak peek into my book 😉


When you’ve bought my book I would love, love, love to get your feedback. Please leave me star ratings and reviews on iBooks. I plan on writing at least three more crochet books with iBooks, so your feedback on the first one is crucial.

I hope you are as excited as I am about Crochet Pretty – Ten Accessories To Make You Feel Pretty.

My pattern in a magazine!

03 Monday Nov 2014

Posted by Natasja in In the press, My crochet, Pattern

≈ 10 Comments

Tags

christmas crochet, crochet, I Like Crochet magazine

I have some very exciting news to share with you today. Something that I’ve had to keep under wraps for months and months. It’s been so hard not to shout it from the rooftops, but now I can:

I am a published crochet pattern designer with a pattern in a magazine! Whoo-hoo!!!!

My very first published pattern is the Festive Lace Doily in the December 2014 issue of  I Like Crochet magazine.

I Like Crochet Festive lace doile I Like Crochet is a bi-monthly interactive digital magazine optimized for tablets and feature top-rated projects, gorgeous photography, step-by-step instructions, patterns, charts, video and more.  Each issue has 30 projects and 7 tutorials. You can buy individual issues for $6.99 or subscribe to any tablet edition on the website, or use your iPad to subscribe in the Apple App Store. It’s a great magazine – and I’m not just saying this because I design crochet patterns for them!

I Like Crochet December 2014

I’m so grateful to finally see one of my designs in a crochet magazine. I’ve worked hard to get to this point in my crochet career and it feels good!

Crochet a caravan keychain

28 Thursday Aug 2014

Posted by Natasja in Camping, My crochet, Pattern

≈ 12 Comments

Tags

camping, caravan, crochet, free pattern, keychain

We’ve now been camping for a month and as you can probably tell from my post-weekend blog posts, we love it! Since I love crochet too, it would only follow that I will crochet camping / campervan / caravan goodies and here is the first one: a caravan keychain.

crochet a caravan keychainYou can whip this caravan keychain up with scraps of yarn in less than a hour.

You will need double knit or light worsted cotton yarn in two shades and a 4 mm crochet hook. Also light grey yarn for embroidery and two small black buttons.

I wrote the pattern in US crochet terms. In UK crochet terms, the SC = DC, HDC = HTR, DC = TR, TR = DTR.

Caravan body. Make two:

Row 1: With colour A (blue in my example) chain 11, SC in the 2nd chain from hook (10 sc)
Row 2: Chain 1, 2 SC in same stitch, 10 sc, 2 SC in same (12 SC)
Row 3: Chain 1, SC in each stitch (12 SC).
Row 4 Chain 1, SC in each stitch (12 SC). Change to colour B (white in my example).
Row 5 – 7: Chain 1, SC in each stitch (12 SC)
Row 8: Chain 1, sc2tog, 8 SC, sc2tog (10 SC)
Row 9: Chain 1, sc2tog, 6 SC, sc2 tog (8 SC). Fasten off.

Door:
Row 1: With colour A chain 4, SC in the 2nd chain from hook (3 SC).
Row 2 – 4: Chain 1, SC in each stitch (3 SC). Change to colour B.
Row 5 – 6: Chain 1, SC in each stitch. (3 SC). Fasten off.

Window and doors:
Use light grey yarn and backstitches to embroider the door onto one of the caravan panels. Use french knot for door handle. Use back stitch to embroider the window. The bottom line of the window should be worked over 4 SC. Work one side diagonally across two rows. The top upper line of the window will then be worked over 3 SC.  Space the window and the door one SC apart.

Repeat the window design on the the second caravan panel, replacing the door with a second window.

Chain:
With colour B chain 22 and fasten off. Use the tail end to sew the chain onto the wrong side of one of the caravan panels, positioning it at the top left corner. Make sure not to stich through to the right side when sewing on the chain.

Finishing:
Sew on a small black button on each caravan panel, positioning the buttonholes in line with the bottom of caravan. Using neat overhand stitches, sew the two sides together with matching yarn.

Caravan keychain front with words

Caravan keychain back

I hope you enjoy making the cute caravan keychain. Please link your keychains to the pattern on Ravelry so that I can see all the happy hooky caravans!

Delicate Daisy Square pattern

14 Thursday Aug 2014

Posted by Natasja in My crochet, Part 3, Pattern, Photo Tutorial

≈ 11 Comments

Tags

free crochet pattern

We can’t have a new Crochet For Kidneys, without a new pattern can we? Part 1 had the Kidney Granny Square, Part 2 had Hexagon In Bloom and now Part 3 has the Delicate Daisy Square.

Delicate Daisy Square crochet pattern

Delicate Daisy square
IMG_8158

You will need double knit or light worsted acrylic yarn in four shades and a 4 mm crochet hook.

I wrote the pattern in US crochet terms. In UK crochet terms, the SC = DC, HDC = HTR, DC = TR, TR = DTR.

Make an adjustable ring (also known as a magic ring). Ch 1, 16 SC in ring, slip stitch to first chain.

Round 1: Chain 11, slip stitch into same sc, *slip stitch into next SC, chain 11, slip stitch into same SC* repeat 14 more times (16 chain loops). Fasten off yarn.Round 1 of Delicate Daisy pattern

Round 2: Join new colour in chain space of any loop. Ch 1,  *SC in chain space, ch 3*. Repeat from * to * 15 more times. Join with a slip stitch to first chain.

Round 2 of Delicate Daisy patternRound 3. Chain 3 (count as DC), *3 DC in 3 chain space, DC in SC. Repeat from * to end. 64 DC. Join with a slip stitch to top of turning chain.

Round 3 of Delicate Daisy pattern

Round 4: Chain 2 (count as HDC), 2 HDC, 5 SC, 3 HDC, *[1 TR, 2 DC, 3 chain, 2 DC, 1 TR] in same stitch. Corner made. Skip 2 DC, 3 HDC, 5 SC, 3 HDC, skip 2 DC*. Repeat from * to * three more times. Join with a slip stitch to 3rd chain of turning chain. Fasten off.

You can use this method to turn any circle of 64 stitches, into a square shape.

Turn a crochet circle into a square

Round 5: Join new colour to any corner space. Ch 1, *3 SC in corner space, 6 SC, Long SC, SC, Long SC, SC, Long SC, 6 SC.* Repeat from * to * 3 more times. Join with slip stitch to first chain. Fasten off. (Long SC is worked into the DC of round 3).

Round 5 of delicate daisy pattern

Round 6: Join new colour to 2nd SC of the three SC worked in corner space. [Chain 3 (count as DC), 2 DC, 3 chain, 3 DC]. Corner made. *DC in each SC and Long SC along to first SC of the three SC worked in the corner space (19 DC). [3 DC, 3 chain, 3 DC] in corner space.* Repeat from * to * two more times. Fasten off and weave away tail ends.

Delicate Daisy round 5

PLEASE NOTE: The squares in these photos are 13cm. To make the square suitable for the Crochet For Kidneys blanket, they need to be 15cm. If your tension is looser than mine, you may reach 15cm by Round 6. If not, do not fasten off round 6 and work as follows:

Round 7: [Chain 3 (count as DC), 2 DC, 3 chain, 3 DC]. Corner made. *DC in each DC of Round 6, [3 DC, 3 chain, 3 DC] in corner space. * Repeat from * to * two more times. Fasten off and weave away tail ends.

I hope you enjoy making this daisy flower square and that you won’t just use it for the Crochet For Kidneys blankets. These squares will make lovely cushions too! With three colours (plus the white border) the pretty colour combinations are endless!

The pattern is also listed on Ravelry here.

Delicate Daisy square

← Older posts

Enter your email address to follow this blog and receive notifications of new posts by email.

Join 2,706 other subscribers
Follow crochetime on WordPress.com

Follow on Bloglovin’

Social

  • View NatasjaKing’s profile on Instagram
  • View Natasja King’s profile on Pinterest

The eBook I wrote

Recent Posts

  • Edward’s Crochet Imaginarium and two pink monsters
  • Review of How To Crochet book by Mollie Makes
  • Buttercup knit and crochet cardigan
  • Kimono Cardigan
  • The Sky is the limit

Categories

As seen on TV Book reviews CAL Camping Crochet For Kidneys Etsy Etsy seller interviews Folksy GIF In the press Knitting Markets My book My crochet My knitting My ramblings Other people's crochet Part 1 Part 2 Part 3 Part 4 Pattern Photo Tutorial Positive Thinking Ta-daah! Terrific Tuesdays Video Watch me crochet Wednesdays Yarnbombing

Instagram

No Instagram images were found.

My designer profile

Blog at WordPress.com.

  • Follow Following
    • crochetime
    • Join 718 other followers
    • Already have a WordPress.com account? Log in now.
    • crochetime
    • Customize
    • Follow Following
    • Sign up
    • Log in
    • Report this content
    • View site in Reader
    • Manage subscriptions
    • Collapse this bar
 

Loading Comments...
 

    Privacy & Cookies: This site uses cookies. By continuing to use this website, you agree to their use.
    To find out more, including how to control cookies, see here: Our Cookie Policy