• Home
  • About me
  • Contact me
  • Crochet How To Links
  • Photo Tutorials
  • Patterns I Designed
  • Crochet For Kidneys
    • Part 1
    • Part 2
    • Part 3
    • Part 4
    • Part 5

crochetime

~ So many patterns, so much yarn, so little time: story of my hooky life.

crochetime

Tag Archives: crochet edge

Watch Me Crochet Wednesday

30 Wednesday Oct 2013

Posted by Natasja in My crochet, Video, Watch me crochet Wednesdays

≈ Leave a comment

Tags

crochet, crochet border, crochet edge, crochet video, iMovie, sharp crochet hook

This is nothing fancy; just a short video of me crocheting whatever I’m working on at the moment. I hope you like it.

In this video you see me using a Sharp Crochet Hook to make a cute border for a washcloth. Jessica Taufner sent me two Sharp Crochet Hook and Pattern Book sets – one for me to use and one to be raffled at the Crochet for Kidney Research UK event. Isn’t she kind?! (By the way, we’re up to eight raffle prizes!) Using the Sharp Crochet Hook was really easy.  I’m using Anchor Freccia 6 and switched to a 2.25 mm crochet hook after using the Sharp Crochet Hook for the first row.

If you like what I’m doing in this video, you can buy a Sharp Crochet Hook on the website here. Jessica posts worldwide.

As the video only shows how I use the Sharp Crochet Hook, here’s a photo of the finished washcloth. In the end I didn’t do a fancy border. Just 5 (US) DC shells with slip stitches between each shell. I think less is more when you’re using teal blue and green…

washcloth edge and crochet cotton


Mainly Grey Sweater Ta-daaaah!

21 Friday Dec 2012

Posted by Natasja in My crochet, Ta-daah!

≈ 19 Comments

Tags

crochet, crochet edge, crochet sweater, wearable crochet

Here it is people, my Mainly Grey Sweater. Ta-daaah!!!!

crochet sweater

I first blogged about it on 31 October, and the yarn was bought way back in May so this has been the longest that I’ve worked on, or planned for, a crocheted sweater. Yarnbombs and hospital visits happened and of course the fact that it consists of 58 squares (!) made it a lengthy project. But it’s done now and I really like it!

The nitty-gritty of the sweater is as follows:

Pattern: Driftwood, a free pattern on the Lionbrand website which you can find here

Yarn: 17 balls of Garnstudio Drops Merino Extra fine in shade 04 (medium gray) and one ball of Sublime Extra Fine Merino DK in redcurrent. I never expected to use 17 balls for this. At £3.10 each that’s £52.70. That’s more that I would pay in the shops for a sweater, but what can you do? No-one said my crochet obsession was going to be cheap. On the up side, I now have a handmade crochet sweater unique to me, so I guess that’s priceless.

Hook: 5 mm

Construction: 58 squares of 11.5 cm x 11.5 cm, two mesh side panels and two mesh sleeve panels

All of the 58 squares had to be blocked before I could sew them together. It was a big job, but so worth it.

Blocking crochet squares

When the sewing together was done, it was time to add the finishing touches. The pattern said I have to do a round of SC followed by a row of slip stitches all around the neck, sleeves and bottom edge. I sort of did what they said….

I did the row of SC in gray as instructed, but then added my HDC of red. Ooo wee, I had been waiting so long for this! The red makes my grey siiiiing!

20121221-114853.jpg

But wait, there’s more. For my last row, again in gray, I did SC, sl st, SC, sl st etc. all round. (I didn’t want to end with red as it would be too obvious, so I needed to finish it all off with another row in gray.) When I turned my work around, I saw that the wrong side of that SC, sl st, SC, sl st row was actually more interesting than the right side, so I made the back, the front. In other words my edging was done as follows:

Row 1: With wrong side facing, SC one row. Turn. (This is as the pattern instructs me to do.)

Row 2: With right side facing, HDC in red. Turn. (The photo above).

Row 3: With wrong side facing, *SC, sl st*.

This photo shows you the end result. A spidery, lacy row of grey over the red stitches.

SC Sl st pattern

This is the neckline of my sweater. I love that intricate grey lines over the red.

20121221-114905.jpg

The pattern calls for mesh inserts on the sides, for size M and upwards, and elongated triangle shape inserts for the sleeves. I think this is genius as it turns the square sweater into something more shapely.

Here you can see the top of the sleeve inserts. They taper to a point towards the bottom edge of the sleeve.

crochet sweater sleeve inserts

This photo shows off the side mesh insert. When I was making the inserts I thought it would be very obvious, but it really isn’t.

side inserts driftwood crochet sweater

The construction of this sweater is extremely adaptable. All you need are 58 squares of 11.5cm x 11.5cm each. That means this pattern can work with granny squares, or any type of square motif as long as it’s 11.5 cm squared! You’ll just need the Driftwood pattern for the mesh inserts. Isn’t that great? Here we have a basic crochet sweater pattern, made up of squares that is wide, wide, wide open to creative interpretation. It’s the kind of pattern you will go back to time and time again. It’s also excellent for beginners.

I’m thinking of making a similar sweater in a summery cotton using one of Jan Eaton’s 200 Crochet Blocks patterns. Can you see it? It would be really great in bright summery colour(s).

Next time when I see a sale on DK cotton yarn, I’m going to buy 17 balls. Yes, my love of crochet is overriding my budget constraints. I’m sure you understand.

How to beautify white towels

06 Saturday Oct 2012

Posted by Natasja in My crochet, Pattern

≈ 2 Comments

Tags

crochet border, crochet edge, crochet pattern

20121006-114705.jpg The tutorial that shows you how I made the crochet border for these towels, are available on Boocoos Blogthingy blog, here.

Boo asked me to be a guest blogger on her blog. I’ve never done a guest blog before, nevermind on the blog of a paid crochet instructor who has been crocheting since she was 8 years old.  I learned a lot just from the Tips, Techniques & Promises section of her blog so I really didn’t think I could do anything crochet related that would be good enough. Luckily Boo liked what I did and even said that I could come back and do a guest blog on her blog again any time. Whoohoo!

I hope you enjoy the tutorial, and all the other interesting crochet related things on Boo’s blog.

Jazzing up a skirt

15 Thursday Mar 2012

Posted by Natasja in GIF, My crochet, My ramblings, Ta-daah!

≈ 12 Comments

Tags

Around the corner crochet, crochet, crochet edge, customise, edging, jan eaton, skirt

So I have this thing for Boden A-line printed skirts, right. I already own three, yet every Winter I get a craving for another colourful, patterned skirt. It only happens in Winter, as Boden’s Winter A-line skirts are of a thicker cotton and the lining is silk (okay, probably a shiny polyester but it looks like silk) that doesn’t cling to tights. Their Summer skirts have a cotton lining that does not work well with tights (if you are as white pasty as I am you need flesh coloured tights in Summer) so I only buy their Winter skirts.

This year, the craving was for the Navy Flower Power skirt. I loved it so much, I even pinned it one of my Pinterest boards the moment I saw it online.

boden flower skirt

It’s as if it was made for me. The colour, the design, the everything! Only problem is that it was a bit pricey at £45 so I waited for the Winter sales. And I waited, and I waited.  Two months ago the little voice(s) in my head said “Go look on the Boden site. They might have a Sale on.” The voices were right. There it was. In my size for £24.50!

In real life it’s even more beautiful, but for some reason Boden decided to make the skirt about 2cm shorter than all their previous A-line printed skirts. That’s not a lot, but when you have ugly, white pasty knees, a knee length skirt that hangs ON your knee is not good. It has to be at least below your knee. What is a hooker to do? Oh I know! Crochet a pretty edge along the hem of the lining !!!!!!! Problem solved, and skirt improved.

Out comes the Skip-Stitch rotary cutter and trusty Around the Corner Crochet Borders book (you can find a link to the book on the right of this page). I chose Border No. 45 and green Sirdar Snuggly Baby Bamboo that I got on sale a while ago.

Here’s what I did:

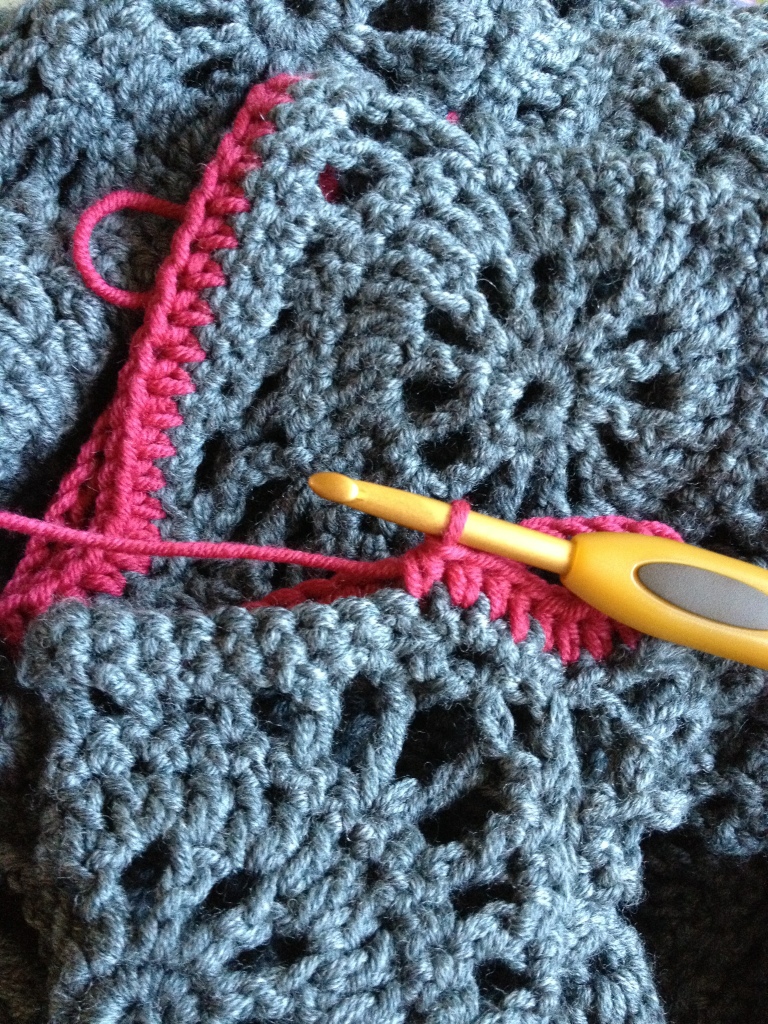
1. I Used the Skip-Stitch blade to make the holes. One quick swipe by hubby while I keep the lining flat, and it’s done.

2. Next step is to make blanket stitches to give a base to crochet on. It’s perfectly all right to skip step. no. 1 if you use a sharp needle for the blanket stitches, but I wanted my holes to be evenly spaced, so I used the rotary cutter and then did the blanket stitches.

3. Then a row of sc. I managed to fit in two sc between each blanket stitch.(I blog in US crochet terms. For a guide to the difference between US and UK crochet stitches, see this handy cut-out by Freshstitches.)

4. As I need the edge to peek out below the hem of the skirt, and the lining is shorter than the skirt, I made 2 rows of *trebles, chain* to quickly make up the 2 cm difference between the lining and the hem.

5. One more row of sc, making one sc in the top of the treble and one in the space between two trebles.

By this stage the edge is already peeking out under the hem of the skirt.

6. Here’s where I started following the pattern for Border No. 45. It was at this point that I stopped for the skirt that I showed you last week.

7. This is the full edging, looking at the wrong side of the crochet. You can see where the edge of the skirt ends, which means I’ve added 4cm to the length, more than making up the 2cm it was too short!

And here it is, as seen from above (please excuse the ugly carpet. I took the photo in the office this morning.)

Ta-daaah, a customised Boden skirt!


Some notes:

You can use any edging / border pattern for your skirt. As long as you at least do steps no. 2 and 3, you can move on to any type of fancy frilly prettiness.

You can also do a crochet edge beautification of a skirt, straight onto the hem of the skirt if it doesn’t have a lining. I like the idea of the edge peeking out underneath, but I know most skirts don’t have linings. The only thing you will have to be aware of, is that your blanket stitching will be visible, so it’s important that those blanket stitches are evenly spaced.

In the first photo of this blogpost, I laid out two crochet hooks on the carpet. That’s because with the first skirt, I used two sizes of crochet hook. I used a 4mm hook up to step no. 5, and switched to a 5 mm hook for the edging. I was using Rowand Handknit cotton for that skirt, but seeing as the Sirdar Snuggly Baby Bamboo is finer than the Handknit cotton, I didn’t need to switch crochet hooks for this skirt.

Speaking of Baby Bamboo. Can I just say: Oh My Goodness! It’s the softest, loveliest yarn ever! My brain can’t work out how bamboo fibers can be turned into yarn, much less into the baby snuggly softness of this yarn.  I’ts bamboo! How is that possible?! Either way, I’m definitely going to use it again for something bigger. Definitely!

As you may have guessed, the skirt jazzing will not stop here. I have two more Boden skirts. Admittedly they are the right length, but a little crochet loving around the hemline is always welcome don’t you think? 😉

Terrific Tuesday

06 Tuesday Mar 2012

Posted by Natasja in My crochet, My ramblings, Terrific Tuesdays

≈ 7 Comments

Tags

Around the corner crochet, crochet, crochet edge, edging, Instagram, skirt, Terrific Tuesday

On a Monday I can still remember the fun I had over the weekend, Wednesday is the middle of the work week, on Thursday I start getting hopeful and on a Friday I can taste the weekend. But what about a Tuesday? It’s so…. just there. Weekend memories are too far away and the upcoming weekend might as well be a year away.

What we need is a bit of colourful inspiration to get us going on a Tuesday, don’t you think? A pretty picture, beautiful scenery or colourful imagery. Yup, that’ll liven up Tuesdays and turn it into a terrific day!

From now on I will go through my photos and Pinterest likes every Tuesday and find us a pretty picture to add colour and joy to the day.

xxxxxx

Here’s me modelling the result of a leisurely Sunday afternoon spent jazzing up a Boden skirt with a croched edge. I have two more skirts I want to beautify with crochet, so I’ll do a proper blog post soon.

Wishing you all a Terrific Tuesday.

Have a good one!

Natasja

Three to go

22 Wednesday Feb 2012

Posted by Natasja in Etsy, My crochet

≈ 5 Comments

Tags

blanket, crochet, crochet border, crochet edge, edging

Nevermind cats & dogs, it’s raining zebras & elephants here this afternoon. Pouring down!

I will be braving the waters to post a baby blanket that was bought on Folksy yesterday.  (Yeah! I love getting sales!) Somewhere in Wales there’s a baby boy waiting for his blanky, so off to the post office I will go.

After last night’s sale I now only have these three blankets left over in my Etsy shop.  If you click on the photo it will take you straight to the blankets section of my shop.

Off I go. Umbrella in hand through the raging waters. Okay, it’s not that bad, but it’s still wet.  I think I’ll have to pop into Costa for an Earl Grey with soy milk on my way back from the post office. Right?


On the edge

03 Tuesday Jan 2012

Posted by Natasja in My crochet, My ramblings

≈ 2 Comments

Tags

Around the corner crochet, blanket, border, crochet, crochet border, crochet edge, edging, Edie Eckman, free pattern

If you follow me on Facebook, you would have seen that 31 December 2011 was a HUGE day for me: I finished crocheting the (what felt like millions of) rows of the Identity Crisis blanket!!!! No more shells. No more rows. No more colour changes. Done – blanky reached double bed proportions.

This meant that on the first day of 2012 I was weaving in ends. Loads of ends. Luckily Hubby lent a hand in his own, ever so practical, way:

Wouldn’t it be wonderful if we really could leave loose ends nicely tied into bows? Unfortunately no 😦

2 January 2012 was all about edging along Edie Eckman’s book Around The Corner Crochet (get it, edging along, crocheting an edge :-)). I chose border #112. It’s a nice and simple pattern that wouldn’t draw attention away from the rows and grannies, but still finishes off the blanket nicely. A border is so important for blankets I think. Strangely enough, Lionbrand doesn’t say you should add a border to the Spicy Delights Afghan pattern. I can’t imagine leaving the blanket edge like this: Can you?


First thing I had to do was create a base row of sc all round. Edie suggests three sc for every two dc on your vertical edges. Horizontal rows are easy, you just do a sc in each stitch of the row. For the corners, use three sc and put a stitch marker in the second/middle sc of the group of three.

The second row of my edging, which is in fact the first row of the pattern, I initially had in maroon, but had to undo it all because the maroon was just too dark to stand out between the navy rows. See what I mean?

This is the white row that replaced the maroon.

Then, the last row of the pattern is dc’s in the sc of your previous row, and three dc’s in each space between.

This is the result. Border #112 done and dusted. However….. I felt it needed something extra. Just something to finish off properly.

So this is what I did. A simple sc row of maroon. It just pulls everything together and I get to use the maroon that I had to undo earlier. Result!

That’s it. With the border on, I was done!!!!

If you want to see the finished product you can have a look at the Facebook page. It’s not the best photo (it’s a bit yellow due to the electric bedroom light) but I was so excited I just had to take a picture. This weekend I will make blanky pose for its photoshoot in lovely natural light and take loads of pictures of all angles. I will also recap the pattern and yarn that I used.

I never thought I’d see the day when I can blog about woven ends and border for this bad boy. I’m so happy it’s done, proud of myself for seeing it through, and I love to see the blanket being used.

I definitely want to make another blanket – smaller!!!! – because I like the idea of crochet blankets to keep friends and family warm and cozy. There are such a lot of patterns and yarn to choose from…..

What am I saying?! Another blanket?! This one isn’t even 24 hours old! I think I just got a shot of the hormone that mothers release straight after childbirth. You know, the one that makes you forget all the pain and agony of childbirth so that you only focus on your beautiful baby? I think it applies to huge crochet projects as well.

I must be….

on the edge of crochet madness.

On the edge

03 Tuesday Jan 2012

Posted by Natasja in My crochet, My ramblings

≈ 9 Comments

Tags

Around the corner crochet, blanket, border, crochet, crochet border, crochet edge, edging, Edie Eckman, free pattern

 If you follow me on Facebook, you would have seen that 31 December 2011 was a HUGE day for me: I finished crocheting the (what felt like millions of) rows of the Identity Crisis blanket!!!! No more shells. No more rows. No more colour changes. Done – blanky reached double bed proportions.

This meant that on the first day of 2012 I was weaving in ends. Loads of ends. Luckily Hubby lent a hand in his own, ever so practical, way:

Wouldn’t it be wonderful if we really could leave loose ends nicely tied into bows? Unfortunately no 😦

2 January 2012 was all about edging along Edie Eckman’s book Around The Corner Crochet (get it, edging along, crocheting an edge :-)). Tou can find a link to the book on the right of this page. I chose border #112. It’s a nice and simple pattern that wouldn’t draw attention away from the rows and grannies, but still finishes off the blanket nicely. A border is so important for blankets I think.  Strangely enough, Lionbrand doesn’t say you should add a border to the Spicy Delights Afghan pattern. I can’t imagine leaving the blanket edge like this: Can you?


First thing I had to do was create a base row of sc all round. Edie suggests three sc for every two dc on your vertical edges. Horizontal rows are easy, you just do a sc in each stitch of the row.  For the corners, use three sc and put a stitch marker in the second/middle sc of the group of three.

The second row of my edging, which is in fact the first row of the pattern, I initially had in maroon, but had to undo it all because the maroon was just too dark to stand out between the navy rows.  See what I mean?

This is the white row that replaced the maroon.

Then, the last row of the pattern is dc’s in the sc of your previous row, and three dc’s in each space between.

This is the result. Border #112 done and dusted. However….. I felt it needed something extra. Just something to finish off properly.

So this is what I did. A simple sc row of maroon. It just pulls everything together and I get to use the maroon that I had to undo earlier. Result!

That’s it. With the border on, I was done!!!!

If you want to see the finished product you can have a look at the Facebook page. It’s not the best photo (it’s a bit yellow due to the electric bedroom light) but I was so excited I just had to take a picture. This weekend I will make blanky pose for its photoshoot in lovely natural light and take loads of pictures of all angles. I will also recap the pattern and yarn that I used.

I never thought I’d see the day when I can blog about woven ends and border for this bad boy. I’m so happy it’s done, proud of myself for seeing it through, and I love to see the blanket being used.

I definitely want to make another blanket – smaller!!!! – because I like the idea of crochet blankets to keep friends and family warm and cozy. There are such a lot of patterns and yarn to choose from…..

What am I saying?! Another blanket?! This one isn’t even 24 hours old! I think I just got a shot of the hormone that mothers release straight after childbirth. You know, the one that makes you forget all the pain and agony of childbirth so that you only focus on your beautiful baby? I think it applies to huge crochet projects as well.

I must be….

on the edge of crochet madness.

Enter your email address to follow this blog and receive notifications of new posts by email.

Join 2,706 other subscribers
Follow crochetime on WordPress.com

Follow on Bloglovin’

Social

  • View NatasjaKing’s profile on Instagram
  • View Natasja King’s profile on Pinterest

The eBook I wrote

Recent Posts

  • Edward’s Crochet Imaginarium and two pink monsters
  • Review of How To Crochet book by Mollie Makes
  • Buttercup knit and crochet cardigan
  • Kimono Cardigan
  • The Sky is the limit

Categories

As seen on TV Book reviews CAL Camping Crochet For Kidneys Etsy Etsy seller interviews Folksy GIF In the press Knitting Markets My book My crochet My knitting My ramblings Other people's crochet Part 1 Part 2 Part 3 Part 4 Pattern Photo Tutorial Positive Thinking Ta-daah! Terrific Tuesdays Video Watch me crochet Wednesdays Yarnbombing

Instagram

No Instagram images were found.

My designer profile

Create a free website or blog at WordPress.com.

  • Follow Following
    • crochetime
    • Join 718 other followers
    • Already have a WordPress.com account? Log in now.
    • crochetime
    • Customize
    • Follow Following
    • Sign up
    • Log in
    • Report this content
    • View site in Reader
    • Manage subscriptions
    • Collapse this bar
 

Loading Comments...
 

    Privacy & Cookies: This site uses cookies. By continuing to use this website, you agree to their use.
    To find out more, including how to control cookies, see here: Our Cookie Policy