We’ve now been camping for a month and as you can probably tell from my post-weekend blog posts, we love it! Since I love crochet too, it would only follow that I will crochet camping / campervan / caravan goodies and here is the first one: a caravan keychain.
You can whip this caravan keychain up with scraps of yarn in less than a hour.
You will need double knit or light worsted cotton yarn in two shades and a 4 mm crochet hook. Also light grey yarn for embroidery and two small black buttons.
I wrote the pattern in US crochet terms. In UK crochet terms, the SC = DC, HDC = HTR, DC = TR, TR = DTR.
Caravan body. Make two:
Row 1: With colour A (blue in my example) chain 11, SC in the 2nd chain from hook (10 sc) Row 2: Chain 1, 2 SC in same stitch, 10 sc, 2 SC in same (12 SC) Row 3: Chain 1, SC in each stitch (12 SC). Row 4 Chain 1, SC in each stitch (12 SC). Change to colour B (white in my example). Row 5 – 7: Chain 1, SC in each stitch (12 SC) Row 8: Chain 1, sc2tog, 8 SC, sc2tog (10 SC) Row 9: Chain 1, sc2tog, 6 SC, sc2 tog (8 SC). Fasten off.
Door: Row 1: With colour A chain 4, SC in the 2nd chain from hook (3 SC). Row 2 – 4: Chain 1, SC in each stitch (3 SC). Change to colour B. Row 5 – 6: Chain 1, SC in each stitch. (3 SC). Fasten off.
Window and doors: Use light grey yarn and backstitches to embroider the door onto one of the caravan panels. Use french knot for door handle. Use back stitch to embroider the window. The bottom line of the window should be worked over 4 SC. Work one side diagonally across two rows. The top upper line of the window will then be worked over 3 SC. Space the window and the door one SC apart.
Repeat the window design on the the second caravan panel, replacing the door with a second window.
Chain: With colour B chain 22 and fasten off. Use the tail end to sew the chain onto the wrong side of one of the caravan panels, positioning it at the top left corner. Make sure not to stich through to the right side when sewing on the chain.
Finishing: Sew on a small black button on each caravan panel, positioning the buttonholes in line with the bottom of caravan. Using neat overhand stitches, sew the two sides together with matching yarn.
I hope you enjoy making the cute caravan keychain. Please link your keychains to the pattern on Ravelry so that I can see all the happy hooky caravans!
We can’t have a new Crochet For Kidneys, without a new pattern can we? Part 1 had the Kidney Granny Square, Part 2 had Hexagon In Bloom and now Part 3 has the Delicate Daisy Square.
You will need double knit or light worsted acrylic yarn in four shades and a 4 mm crochet hook.
I wrote the pattern in US crochet terms. In UK crochet terms, the SC = DC, HDC = HTR, DC = TR, TR = DTR.
Make an adjustable ring (also known as a magic ring). Ch 1,16 SC in ring, slip stitch to first chain.
Round 1: Chain 11, slip stitch into same sc, *slip stitch into next SC, chain 11, slip stitch into same SC* repeat 14 more times (16 chain loops). Fasten off yarn.
Round 2: Join new colour in chain space of any loop. Ch 1, *SC in chain space, ch 3*. Repeat from * to * 15 more times. Join with a slip stitch to first chain.
Round 3. Chain 3 (count as DC), *3 DC in 3 chain space, DC in SC. Repeat from * to end. 64 DC. Join with a slip stitch to top of turning chain.
Round 4: Chain 2 (count as HDC), 2 HDC, 5 SC, 3 HDC, *[1 TR, 2 DC, 3 chain, 2 DC, 1 TR] in same stitch. Corner made. Skip 2 DC, 3 HDC, 5 SC, 3 HDC, skip 2 DC*. Repeat from * to * three more times. Join with a slip stitch to 3rd chain of turning chain. Fasten off.
You can use this method to turn any circle of 64 stitches, into a square shape.
Round 5: Join new colour to any corner space. Ch 1, *3 SC in corner space, 6 SC, Long SC, SC, Long SC, SC, Long SC, 6 SC.* Repeat from * to * 3 more times. Join with slip stitch to first chain. Fasten off. (Long SC is worked into the DC of round 3).
Round 6: Join new colour to 2nd SC of the three SC worked in corner space. [Chain 3 (count as DC), 2 DC, 3 chain, 3 DC]. Corner made. *DC in each SC and Long SC along to first SC of the three SC worked in the corner space (19 DC). [3 DC, 3 chain, 3 DC] in corner space.* Repeat from * to * two more times. Fasten off and weave away tail ends.
PLEASE NOTE: The squares in these photos are 13cm. To make the square suitable for the Crochet For Kidneys blanket, they need to be 15cm. If your tension is looser than mine, you may reach 15cm by Round 6. If not, do not fasten off round 6 and work as follows:
Round 7: [Chain 3 (count as DC), 2 DC, 3 chain, 3 DC]. Corner made. *DC in each DC of Round 6, [3 DC, 3 chain, 3 DC] in corner space. * Repeat from * to * two more times. Fasten off and weave away tail ends.
I hope you enjoy making this daisy flower square and that you won’t just use it for the Crochet For Kidneys blankets. These squares will make lovely cushions too! With three colours (plus the white border) the pretty colour combinations are endless!
On a Monday I can still remember the fun I had over the weekend, Wednesday is the middle of the work week, on Thursday I start getting hopeful and on a Friday I can taste the weekend. But what about a Tuesday? It’s so…. just there. Weekend memories are too far away and the upcoming weekend might as well be a year away.
What we need is a bit of colourful inspiration to get us going on a Tuesday, don’t you think? A pretty picture, beautiful scenery or colourful imagery. Yup, that’ll liven up Tuesdays and turn it into a terrific day!
From now on I will go through my photos and Pinterest likes every Tuesday and find us a pretty picture to add colour and joy to the day.
xxxxxx
A friend of the work colleague who I made granny bunting for (I blogged about it here), loved the bunting so much that she also placed an order. I was more than happy to oblige. This is what it looked like last week Friday when I was sitting outside crocheting granny bunting. There is no way that I can crochet without tea in my favourite somewhere-between-a-mug-and-a-teacup Anthropologie drinking vessel and mini doilie coaster. So many colours, patterns and crochet together in one square photo!
You know I don’t do pink, but I really love that strawberry ice cream shade of pink Vinnis Nikkim. It’s in my Etsy shop for £3 a ball. The grey and white mini doilie is also for sale in my Etsy shop. (No-one is buying it so I may as well use it. Right?)
I’ve been crocheting a baby blanket for a lady at work and now it’s time to share it with you. Lynette suffered from a major illness last year (I don’t know the details, I just know she was at death’s door) but miraculously recovered, only to find out a couple of months later she was expecting again. She already has two teenage children and wasn’t planning on getting pregnant. I think Baby No. 3 is a second chance, don’t you agree? I mean really. She was near death, recovers and then falls pregnant. There must be more to it than just “a unexpected pregnancy”. Knowing how special this baby is I put a lot of love into her blanket. You would too, wouldn’t you?
First step was to find a pattern. There are thousands of baby blanket patterns out there. Luckily, just before Lynette asked me to crochet her a blanket, I had my yearly magazine clear-out. For some reason I decided to keep the Simply Crochet Summer 2012 issue. It was one of their early issues, before they had their make-over. There isn’t really anything I would want to make for myself in that issue, but I kept it anyway. Strange how that works…. or not so strange because that issue contained a beautiful baby blanket pattern by Sirdar! I showed it to Lynette and she loved it.
That pattern is for a newborn baby (61 x 76cm), but Lynette wanted something bigger that could be used for longer, so we decided on dimensions of roughly 76 x 89 cm. I used the same yarn as suggested by the pattern, so it was just a case of making a longer foundation chain and adding a few extra pattern repeats. I ended up with a 72 x 92cm blanket. I realised I could (should?) have added two more pattern repeats in the row which would have brought it closer to the 76cm width, but I think the length will make up for the slightly smaller width.
The wavy “cosy cuddles” pattern is easy to do and you get into the rhythm of it quite quickly, but it looks much more complicated. The pattern doesn’t call for a border but I like adding borders to blankets. It just feels unfinished without. It also helps to bring a blanket to the desired size… I chose border no. 99 from Around The Corner Crochet.
Size with border: 72 x 92cm. 23 Pattern rows, with 13 pattern repeats per row.
The blanket is now wrapped and tagged with Ravelry tags, ready to give to Lynette on Monday. (I love my Ravelry tags. It’s printed on thick card and on the bag are care instruction symbols that you can circle with space to write the fibre content of the yarn. It’s only $5 for a pack of 6. If you make a lot of crochet for others as gifts, this is really handy.)
I hope Mom and Baby likes the blanket. I enjoyed making it and put a lot of love into it. I can see why people enjoy making baby blankets – it’s quick, satisfying and you are making something warm and snug for a tiny person. I like that.
A friend at work recently asked me to make crochet bunting for her garden. There’s a lot of patterns around for crochet bunting but they are either to frilly or to plain for me. What I wanted was a basic triangle that could be made with at least four colours. Something like a granny square, but not square. I found the perfect solution in Crochet (DK), a hard cover book by DK. The book was sent to me by the publishers to review a couple of months ago. I’m ashamed that it took me so long to do the review, but in my defence I don’t want to review a book unless I could use of the book’s patterns. The bunting order was the perfect opportunity to do my review, so here it is.
Crochet (DK) is a step-by-step guide with clear photographic technique instructions and over 80 crochet designs. Beginners wishing to learn how to crochet will find all the stitches and techniques twinned with beautiful projects to build up confidence, whilst experienced crocheters can choose between classic and modern crochet makes. Projects cover items for the home, to wear, toys and bags. The book also contains handy info on crochet terms, symbols and abbreviations and teaches how to follow crochet patterns.
The projects are beautifully photographed and you will love the big A4 pages of prettiness.
Crochet (DK) can easily become the crochet go-to compendium. The book really teaches everything there is to know about crochet, has beautiful projects to make and the photography and styling is just lovely.
DK also sent me a copy of A Little Course In Crochet. It’s part of a popular series of learning guides from DK that explain everything and assume nothing.
The two books are very similar, with A Little Course In Crochet being a more concise version of Crochet using the same photos and teaching the same techniques and stitches, only in a smaller format.
Don’t think that the smaller book is any less useful, or not worth buying. It’s just as beautifully laid out and teaches you almost everything that Crochet does, just with less projects and less of the “fancy” crochet techniques like broomstick or Tunisian crochet for instance. DK managed to squeeze in everything you need to know into a smaller book by writing a lot of the instructions on the photo itself, as opposed to writing it out as text next to the photo like in Crochet. You can see this in the example below for fastening off stitches. (I laid A Little Course In Crochet on top of Crochet.)
Just like Crochet the project photos also fill a whole page, so it’s just as visually pleasing.
I feel very grateful that DK sent me these two beautiful books. I won’t ever have to buy an instructional crochet book ever again. If I had to pick which one I prefer, I would say bigger is better, and go for Crochet. It’s just so beautiful to page through and there are quite a few projects that I would want to get my hooks into. If you want to know all about crochet, you may as well get the book that really teaches absolutely everything.
As for my granny bunting, I made it by combining the Party Bunting pattern with the triangle granny from the Tools & Techniques section.
Party Bunting pattern
Granny square triangle
This string of seven bunting flags will be given to my work colleague tomorrow. She asked for “easter colours” so I used a combination of Vinnis Nikkim and Stylecraft Cotton Classique. I enjoyed making these bunting flags and found it very easy to follow the patterns in Crochet.
Crochet is currently on sale on Amazon for £15 (RRP £25), and A Little Course In Crochet is £4 on Amazon (RRP £9.99).
*These books were sent to me by the publisher. I did not receive payment for doing the reviews. The opinions are my own. There are affiliate links in this post, which help me run my blog.
On Saturday morning I took advantage of the hour of sunshine and lay the blanket out on the patio table to take photos for you.
In case you’re wondering, I’m using Hayfield Bonus DK and Baby DK, and the pattern for my squares is Lacy Cross from Jan Eaton’s book 200 Crochet Squares.
Being 6 months in, I can truly say, hand on heart, that my moods are
all
over
the
place.
More so, around the middle of the month – I blame hormones. On the up side, I don’t have a lot of red squares which is a good thing – red is the colour I allocated to stress.
Are you taking part in Crochet Mood Blanket 2014? Have you learned anything about yourself in the process of documenting your daily moodswings?
I was chatting to my mom yesterday and she reminded me that Fathers Day was on the 15th of June. Living in the UK, with parents living in South Africa I always have to plan far ahead to get presents and cards to them in time. (Mothers Days is even more of a planning mission because Mothers Day in South Africa is on a different day than Mothers Day in the UK. Very confusing and easy to forget about!) Thank goodness for Moms who remind us about Fathers Day, making it possible to crochet a gift for Dad in time.
I whipped up this easy striped coaster with DAD embroidered in cross stitch in an afternoon.
With this quick pattern and two weeks to go to Fathers Day you won’t have any excuse not to make him a crocheted gift. And if, like me, you need to post the gift, the coaster is ideal to pop inside a greeting card.
The pattern is written in UK crochet terms. For US readers, the DC is SC.
Using colour A, chain 20.
Row 1: DC in 2nd chain from the hook, DC to end (19 DC).
Continue working in DC as follows:
Row 2 – 4: colour B
Row 5: colour A
Row 6: colour C
Row 7: colour B
Row 8 – 9: colour C
Row 10: colour A
Row 11 – 12: colour B
Row 13: colour A
Row 14: colour B
Row 15 – 17: colour C
Row 18 – 19: colour A
Row 20: colour B
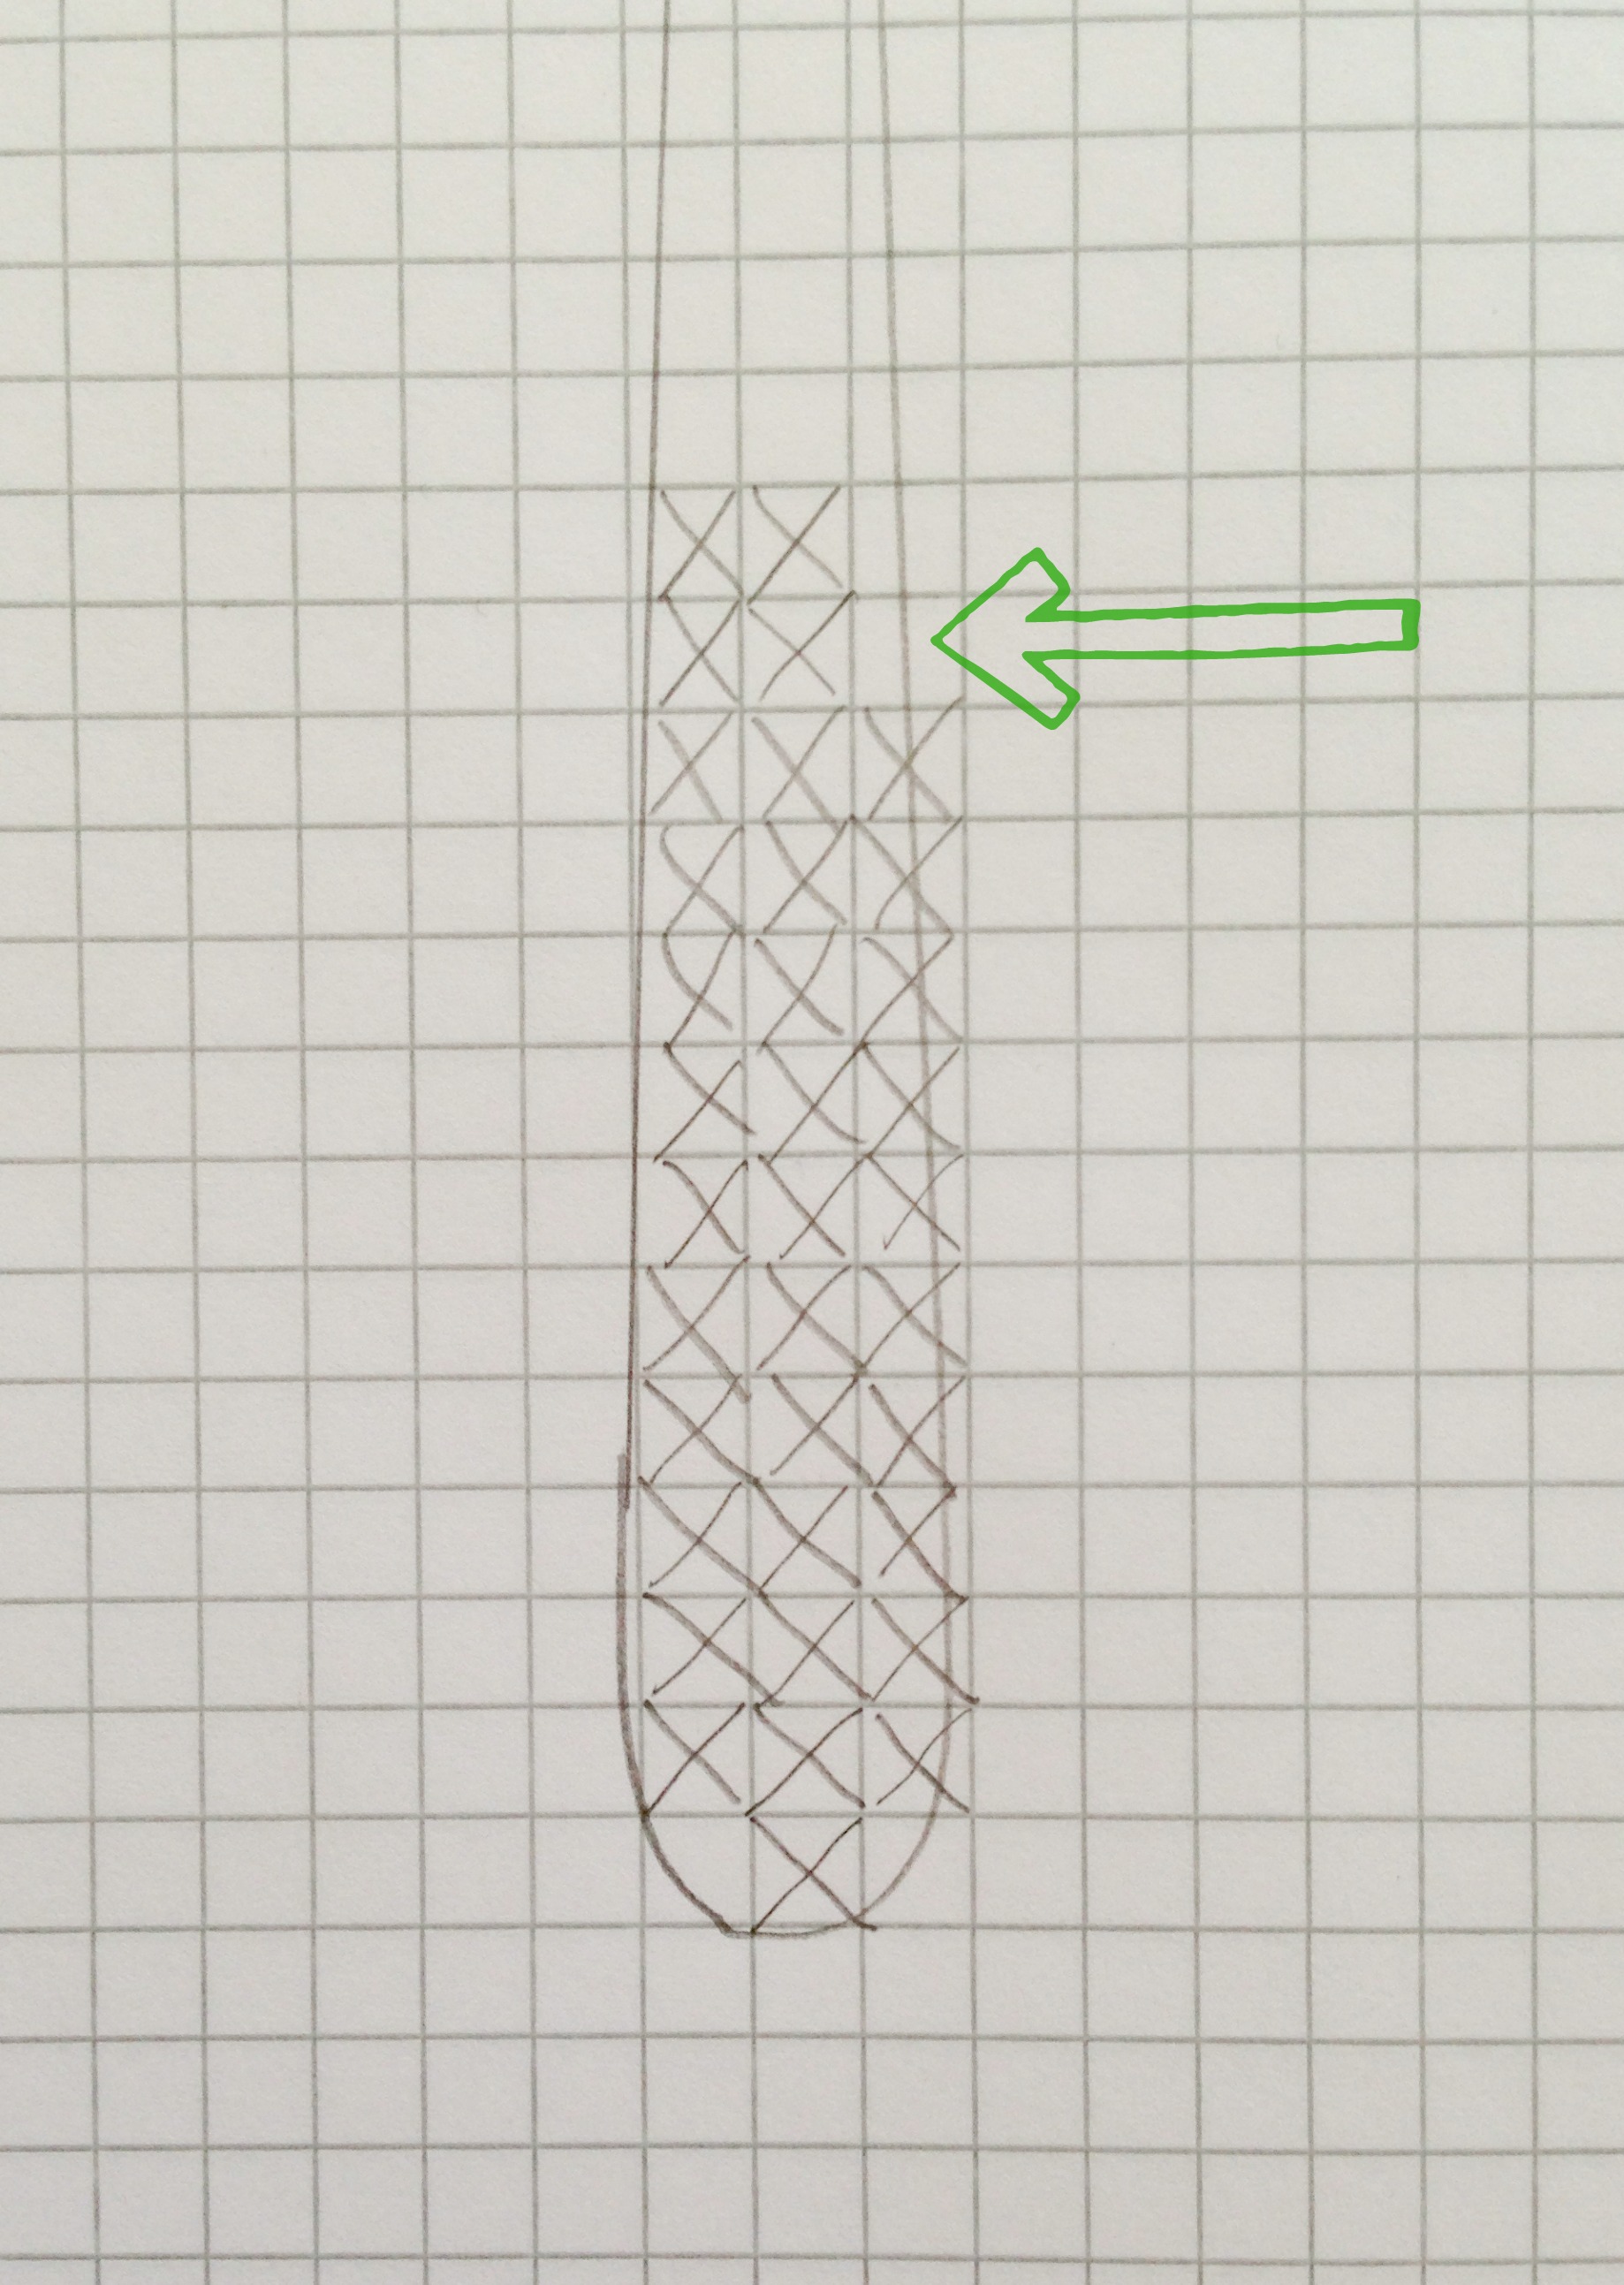
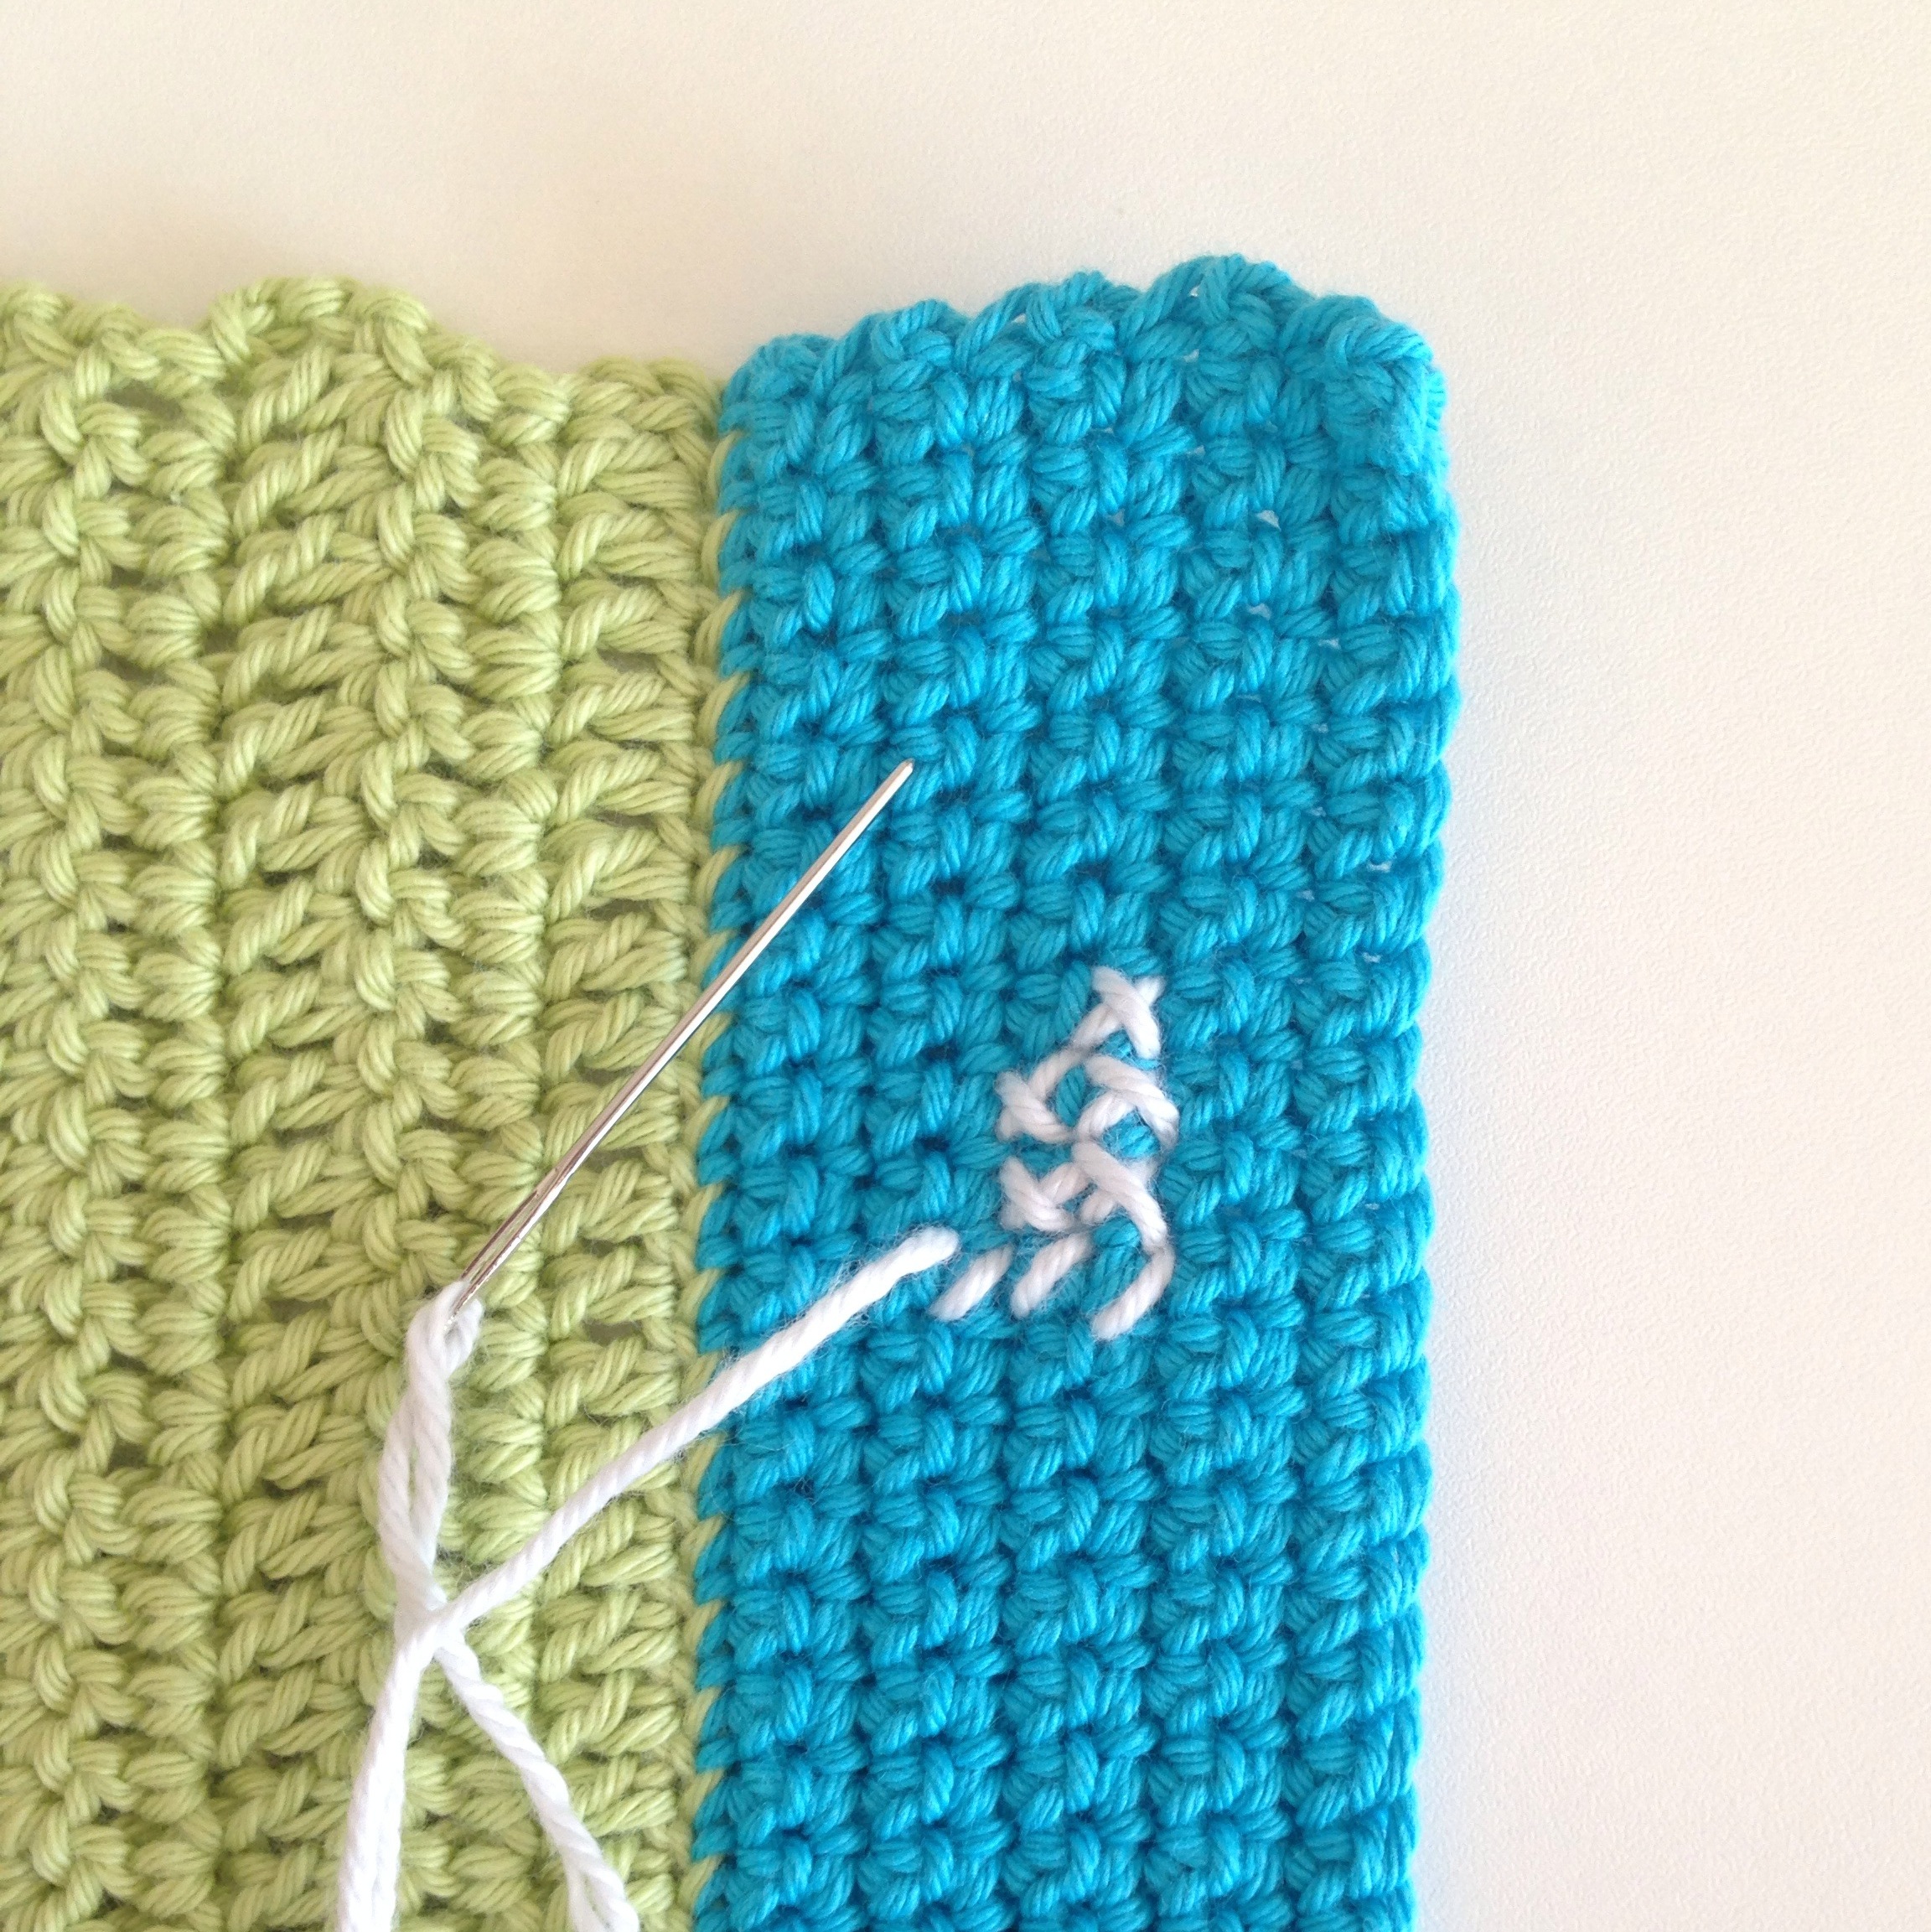
Block the square using the wet block technique. Use dark blue to cross stitch DAD down the left side of the coaster. Leave two rows unworked at the top and bottom, and one DC stitch unworked on the side.
If you want to know more about cross stitching onto crochet, I explain it more fully in this post.
I hope you enjoy making this striped coaster for Dad. The pattern is listed on Ravelry, so please link your projects so that I can see your coasters!
Today I’m sharing a super easy crochet placemat pattern with you. You’re probably thinking that placemats are very boring right? Boring and practical. Who wants boring and practical? Not me! I want interesting and different, so I added a bit of cross stitch. Not just any cross stitch, no I added an exact replica (minus one tiny prongy detail) of the King Household’s knives and forks!
Check it out.
I love it! With these placemats your table is always set even if you eat with your hands. How very civilised.
So how did I do it? It’s dead easy.
To make the placemats you will need double knit cotton in three shades and a 4 mm crochet hook. I used Stylecraft Classique Cotton DK in Azure and Soft Lime and Rowan Handknit Cotton in Mist. Sadly Mist has now been discontinued but you can use white or any light grey yarn.
My placemats are 30 cm x 45 cm. The green one is worked in trebles and the blue placemat in half trebles. To achieve this size, I worked 33 rows of trebles and 43 rows of half trebles. The foundation chain for the green treble square was 54 chain stitches (51 plus 3 for the turning chain) and 53 chain stitches (51 plus 2 for the turning chain) for the turquoise half double crochet square. In both cases I did the big square first and then joined the other colour to the top and the bottom and worked 10 rows of double crochet. I don’t want to call it a pattern, because it really isn’t and you will make your placemat to fit your table / breakfast bar / lap tray. Use my rows and chains as a guide.
I may not have written up a proper pattern, but I would like to pass on some handy tips for you.
HANDY TIP 1: place a stitch marker in your first and last hdt or tr. That way you will know where to insert your hook for the next row and wont accidentally create extra stitches on the sides. In patterns where the turning chain counts as a stitch (for these placemats I didn’t count the turning chains) you will place the marker in the top chain of turning chain. So if you are working in hdt, place the stitch marker in the 2nd chain, and for a trb place it in the 3rd chain. Stitch markers are, I dare say, essential where turning chains are to be counted as stitches. I think apart from my crochet hook en scissors, stitch markers are probably my most valued crochet tool.
HANDY TIP 2: to save you from weaving away the tail end when you join the new colour for the double crochet side panels, flick the tail end of the new colour over your working yarn as you make the stitches. The tail end will magically grow shorter and eventually disappear, yet be safely encased within each stitch. It’s a very clever way of halving the tail ends you have to weave away! At the same time you can crochet over the tail of the old colour. This method saves you from having to weave away two tails. Score!
Here’s a video showing you how I do it.
Once the crocheting is done, you’ll want to get on to the cross stitch bit, but before you can cross stitch on crochet you have to block the piece – that’s the HANDY TIP 3. If you do it afterwards you run the risk of the cross stitch design going all skewy. The double crochet panels will naturally want to curve and it will be worked tighter than the rest of the placemat, so blocking really is essential here.
So how should I block you ask? It depends on what fibre your yarn is made of. If your fibre is artificial, like acrylic: 1) pin the piece in the shape you want it to be onto a couple of towels on top of your ironing board, wrong side facing up, 2) cover with a damp cloth and then 3) hover with your steam iron over the cloth. Do not let the iron touch the cloth. All you want is a bit of steam to set the shape. Also don’t hover very long – a few seconds will do. If it’s a natural fibre like cotton or linen: 1) dampen the crochet, 2) spread it out on a foam board or layers of towels right side facing up, 3) stretch and lightly tug the crochet until it’s perfectly round or square or whatever shape it should be. Then 4) pin it and 5) let it dry over night. I used cotton for my placemats so this is the method I used.
If you’re wondering about the red lines on my foam blocking mat, they were drawn on by me with a Sharpie on a wintry Sunday afternoon a couple of months ago. It took the whole afternoon and was a very boring job, but I’m really glad I took the time to do it. The point of blocking is to get the edges of your crochet straight, so to me it makes sense to have straight lines on the blocking board. (Although looking at the photo I didn’t really follow those lines very well did I…?)
Once blocked you are ready to embroider.
You will need a piece of double crochet to embroider on. Cross stitch onto crochet can only really happen on double crochet stitches. The dense texture and evenly spaced short stitches replicates Aida (the fabric used for cross stitch) perfectly. As an added bonus, when you make double crochet stitches in double knit yarn, your stitches will almost certainly be 5 mm squared, which makes it perfect for designing with quadrille paper. Which brings us to the next item you will need: quadrille paper (it’s like graph paper, but the squares are all 5mm squared). You’ll also need a pencil and of course your eating utensil of choice.
Using a pencil, trace the outline of your knife and fork onto the quadrille paper.
Now you fill in each square with a x. Your knife and fork shape will not follow the straight lines, but that’s where creative licence comes in: in conventional cross stitch you also use half stitches but for cross stitch onto crochet, that’s tricky to do, so whenever the line goes through less than half of a square, ignore that square. Here you can see the outline of my knife encase three squares (two full ones and a half), but I only created two cross stitches.
The overall effect is still a knife and that’s all that matters. Creative licence also turned my 4 prong fork into a 3 prong. I just had to forgo a prong in order for there to be unworked space between my prongs. It’s a small sacrifice to make.
Once you have filled in the squares with x’s, go over them with a pen so they are darker and you can see if you are happy with the shape created.
Cut out the shapes and place them on your placemat, moving them around and spacing them evenly. Use pins to indicate the top, bottom and any other points along the knife or fork that you want to be sure to get right. I placed pins where the prongs stopped and where the shape changed from xxx to xx. These are just guides to keep you on track.
Now you’re ready to start cross stitching. You’ll soon get the hang of it and will almost naturally feel where the stitches have to go. The key to neat cross stitches is to keep the bottom stitches all slanting in the same direction, and the top ones in the opposite, but same, direction.
When you’ve finished your embroidery, crochet a border of double crochet stitches in the main colour all around your placemat to visually pull it all together. Make three double crochets in the corners. Weave away the (very few) tails you have left – remember Handy Tip 2? – and maybe block it again just be sure that the placemats are perfectly straight on the sides and pointy in the corners. That’s all there is to it. Easy, right?
Doesn’t it look great?! Now that you know that one square on quadrille paper equals one double crochet square in double knit yarn, you can draw – and therefore cross stitch – anything on your crochet! How about cross stitching the words “breakfast” “lunch” or “dinner”? Or personalising the placemat with the name of each of your family members?
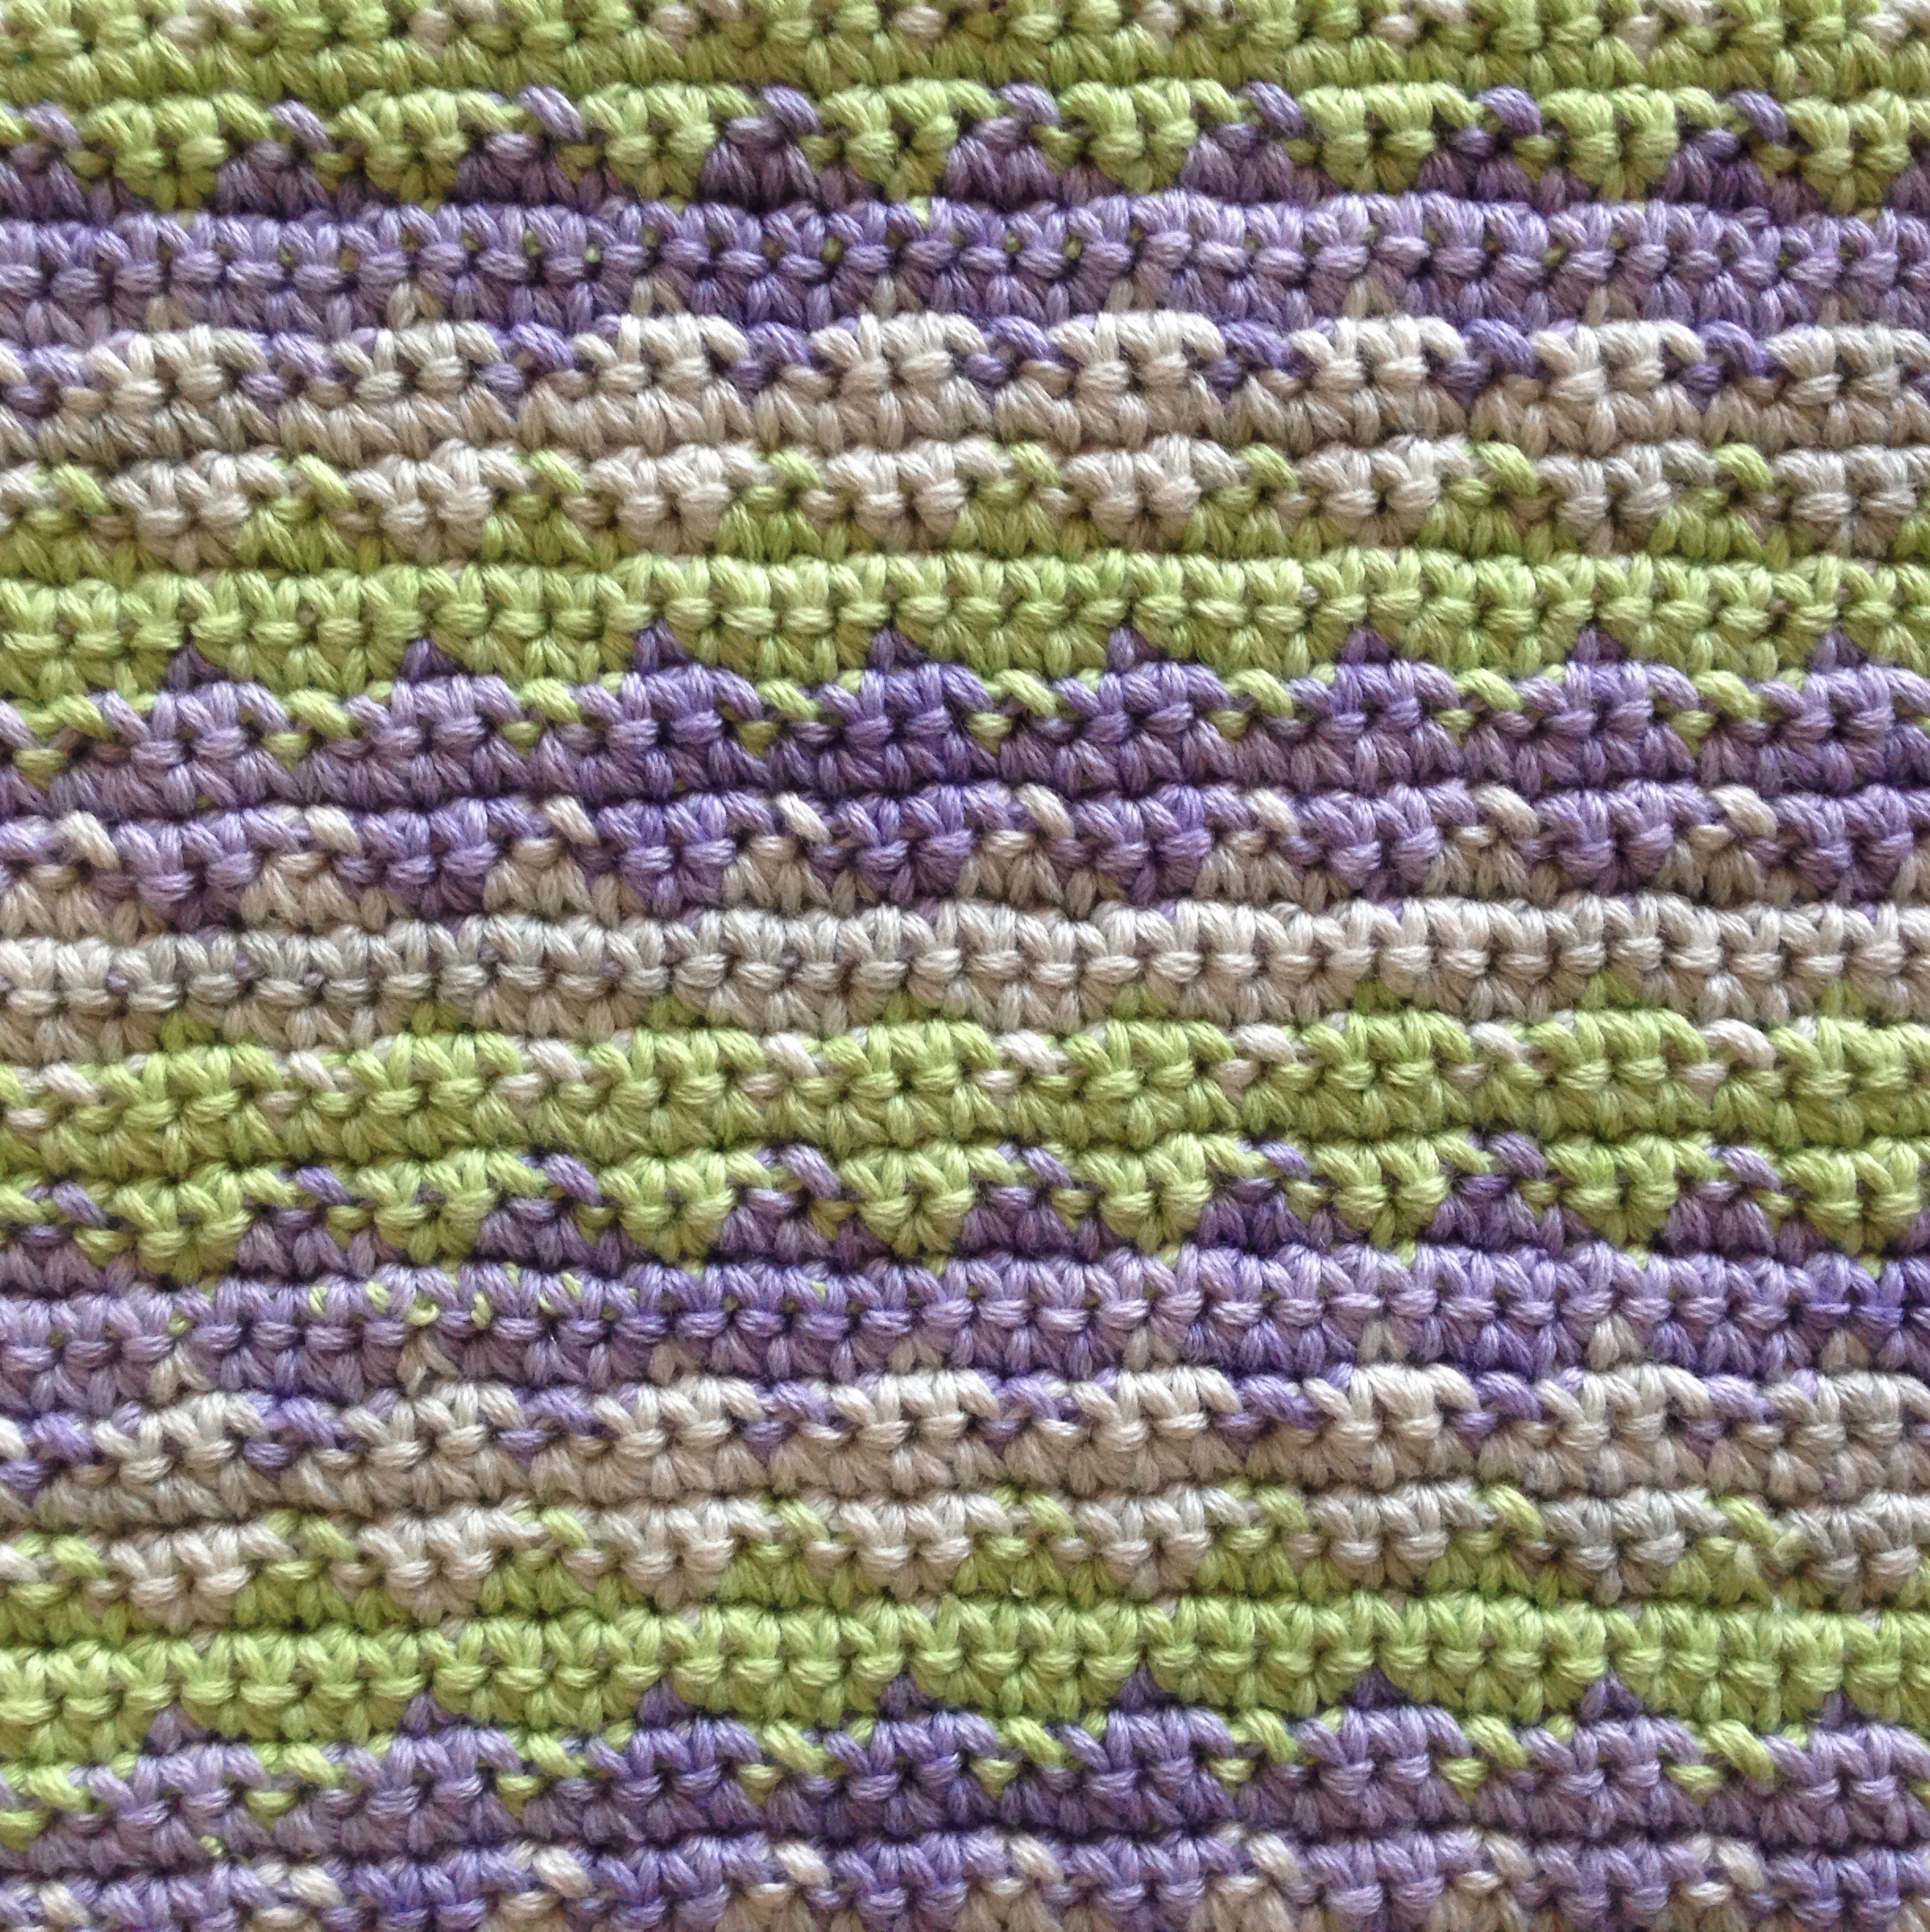
Have you ever tried tapestry crochet? I read about it for the first time in issue six of Simply Crochet magazine. Tapestry crochet is similar to regular crochet, except that one or more yarns are carried while another is crocheted. The finished pieces look woven instead of crocheted. I immediately fell in love with the graphic patterns you can create with only the use of only double crochet stitches and lots of colour. As much as I like lacy, feminine crochet patterns (see my lacy coasters) I’m even more drawn to strong, sharp, repetitive designs like stripes, chevrons, diamonds and simple polka dots. Tapestry crochet lends itself to exactly that type of design.
There are some amazing things made with tapestry crochet. I love the shoulder bag, but I was blown away by the tapestry crochet vase by the tapestry crochet artist Caroline Routh!
For a first time project, the Cozy Up tablet cover by Vicky Brown published in Simply Crochet issue six was ideal for me. There are only three colours and you just need to make a rectangle shape for the front, a simple back and then work the edges together. I struggled a bit with carrying the yarn and when to change colour, but luckily the American website www.tapestrycrochet.com has an excellent tutorial. The trick with changing colour in tapestry crochet is to think ahead, because you need to change to the new yarn colour while you still have two loops of the incomplete double crochet stitch on your hook. It doesn’t take very long to get used to working this way but at the beginning the brain juices were almost boiling – tapestry crochet made a nice challenging change from crocheting granny squares.
The nitty-gritty of my laptop sleeve:
Pattern: Cozy Up table cover by Vicky Brown published in Simply Crochet magazine issue 6 (May 2013)
Yarn: Vinnis Nikkim cotton DK in Avocado, Lilac and Stone
Crochethook: 3.5 mm
Modifications: I adjusted the size to fit my Macbook Pro and also added an envelope style flap to the back panel that folds over to the front. In stead of a solid colour back, I added stripes in Avocado and Lilac. I also didn’t use double crochet to join the two sides, but rather used overhand stitches to sew it together.
Front
Back
The envelope style flap was easy to make. I just decreased a stitch on both sides of 10 rows. Now biscuit crumbs dust can’t get into the ports at the side.
Isn’t this apple button absolutely the best? I mean really? An apple button for an Apple Macbook! And it’s green! I can’t even remember where or when I got it, but I thank the gods of crochet for sending it to me.
I use my laptop sleeve every day to keep the Macbook snug & protected and to keep the laptop from scratching my Office Behind The Door table. No, I lie. The table doesn’t need protection from scratches – I just like looking at the apple button and I want to use my laptop sleeve as much as possible. It’s so pretty and I concentrated so hard to make those diamonds!
If you haven’t guessed, I worked on this blog post over the Easter weekend. Wonder what gave it away? 🙂
How are you all doing on this first Thursday of April 2014. It’s crazy to think that we are only a few weeks away from Easter isn’t it? Have you had a hot cross bun yet? Sneaked a little Creme Egg into your handbag? Crocheted something Easter themed? I’m planning on making an Easter wreath this weekend with the goodies I picked up at the Hobbycraft Easter press day. It will be my first time making a wreath and I’m very excited. I’ll do a quick blog post, and post a photo on my Facebook page, to show you what I did. I’m definitely thinking pompoms…
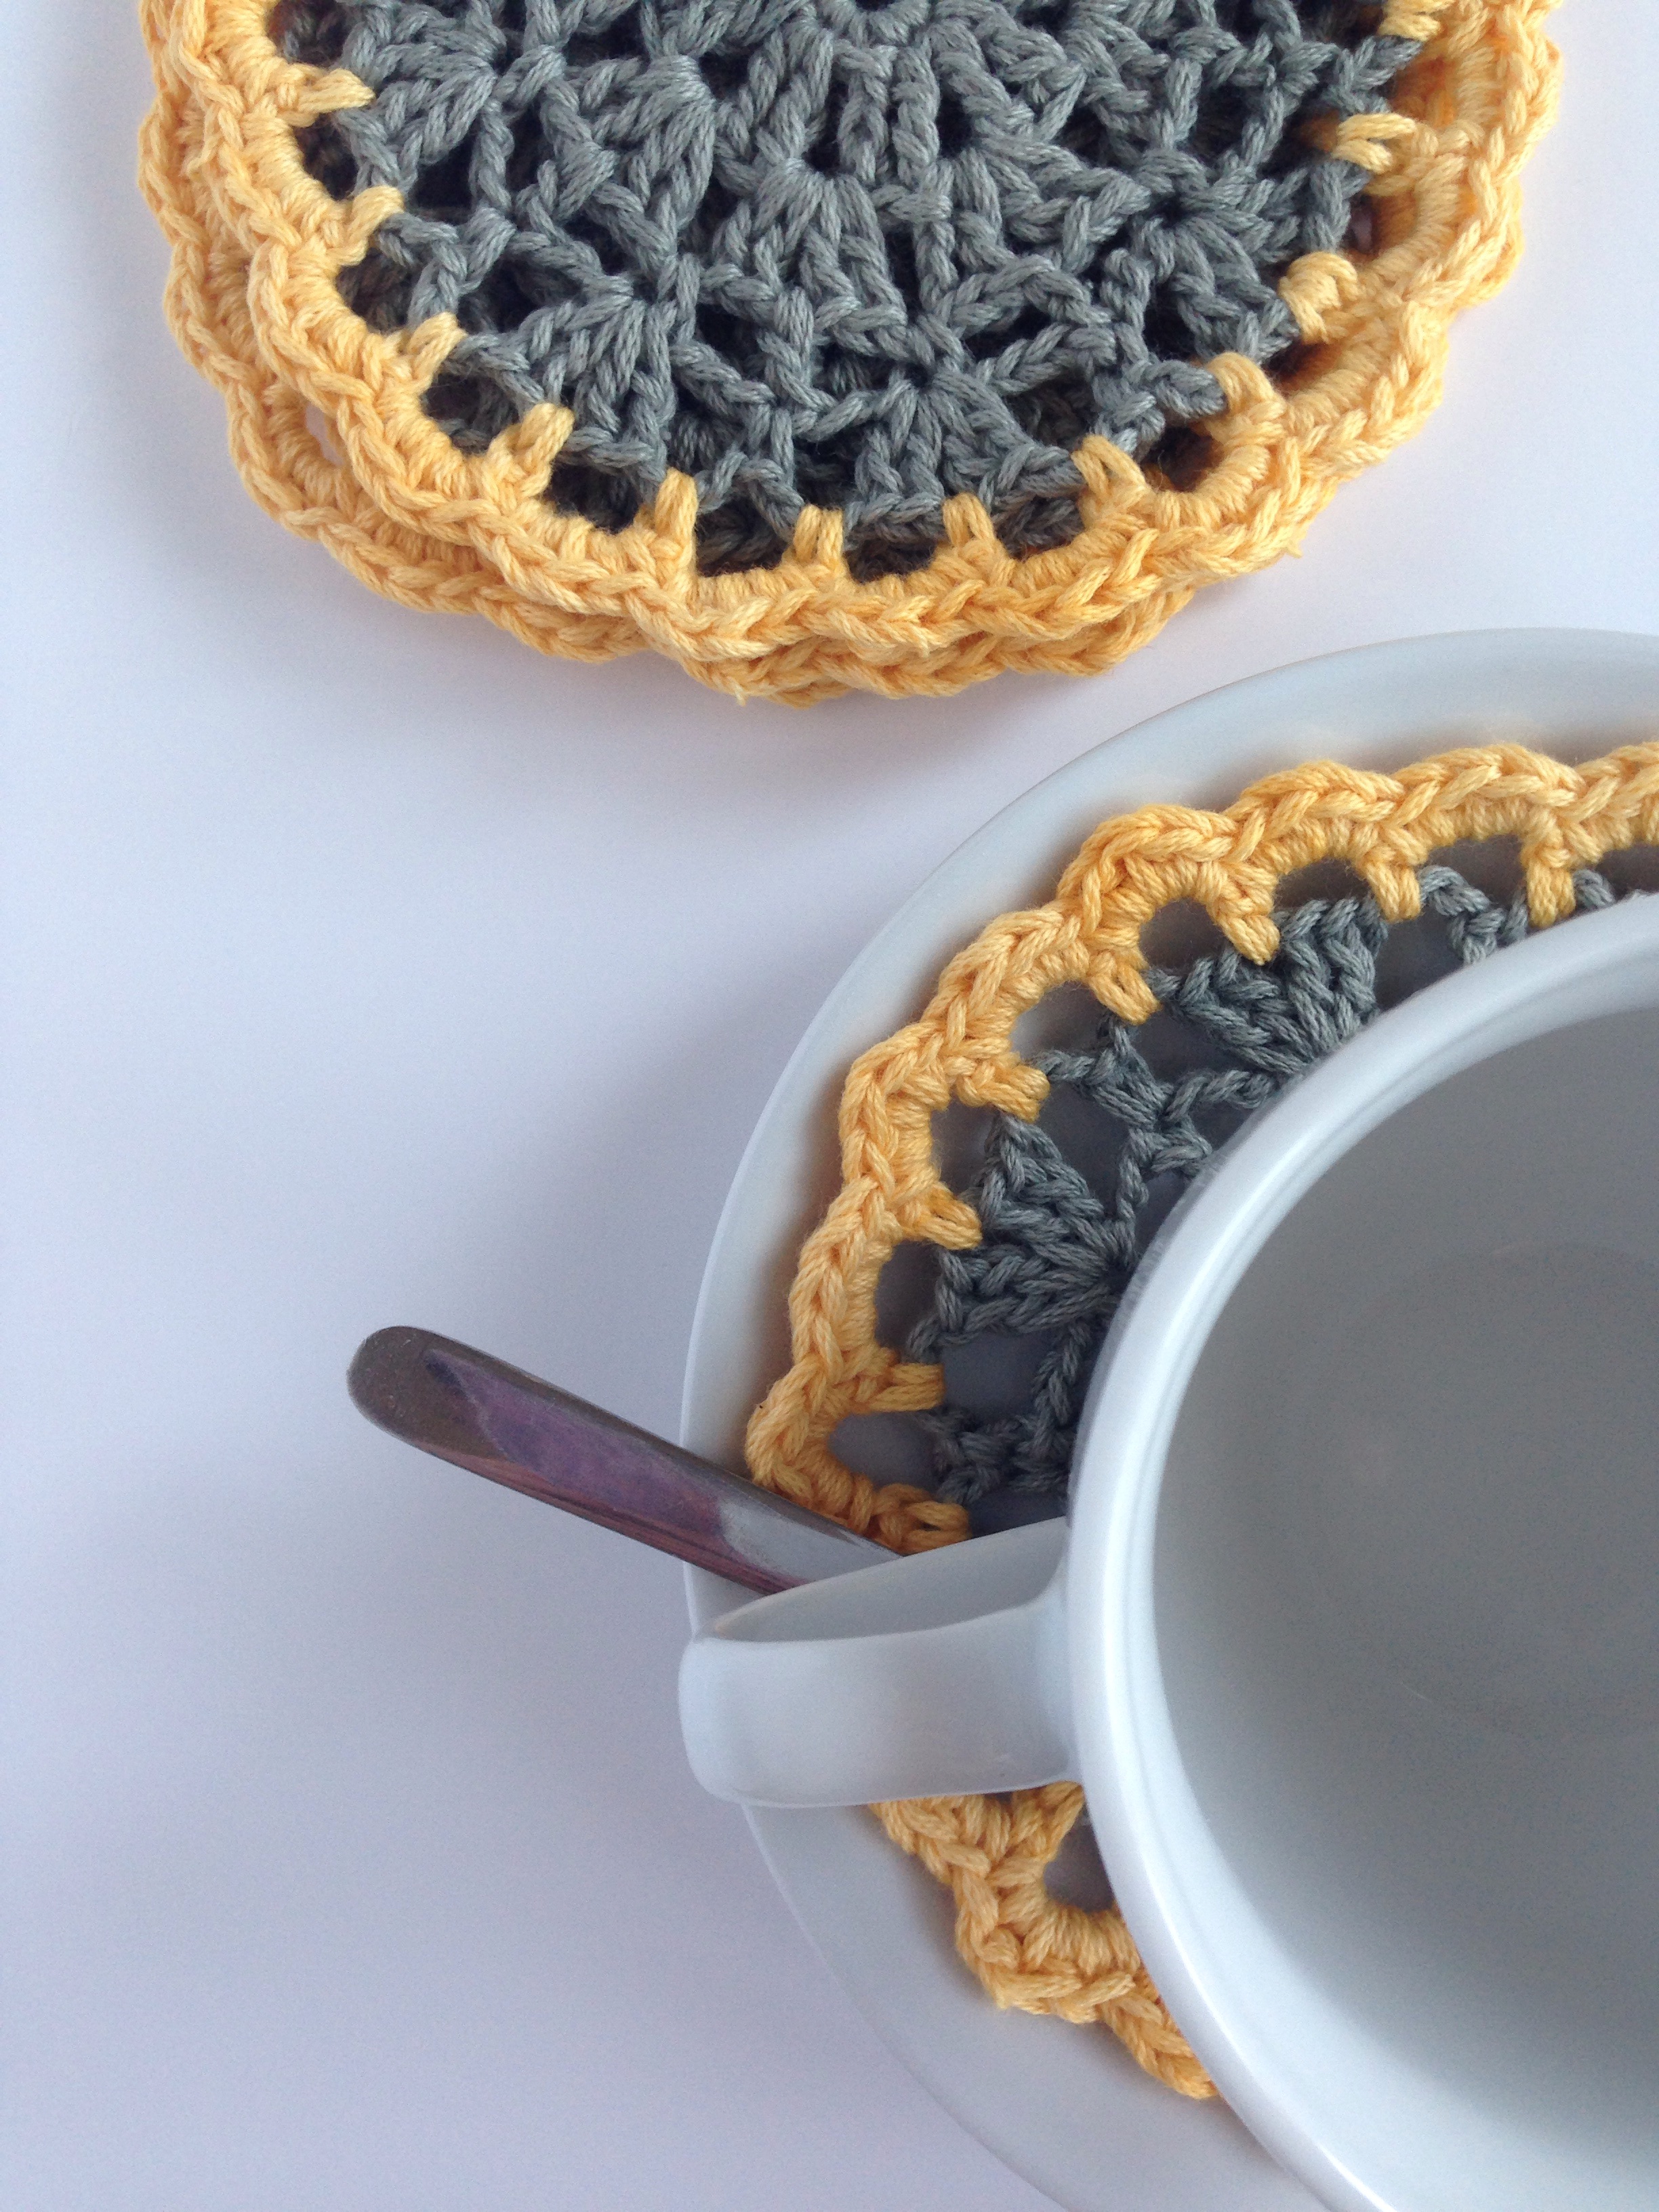
Today I just wanted to show you the three sets of lacy coasters that I made. These are the ones that I made by modifying my Lacy Coaster pattern last week (see my tale of woe and frustration here).
Looking at the photos, I’m really happy with how they turned out. Using a masculine grey for feminine lacy crochet really gives me a kick and I’m loving the gloomy grey contrasting with the bright yellow and pink, and looking stylish against the off-white. There’s just something about grey that I love. It’s a great neutral colour which makes anything else you put with it, “pop” yet it’s not as boring as black or dull like brown.
Navy would be my other Alternative Neutral. Oooh there’s an idea I need to explore! Just the other other day I read that navy has been hailed the new black for interiors and fashion. I may just have to whip up a coaster or two in navy with a colourful border, but for now, here are my Happy And Gloomy coasters.
Technically they are coasters, but I like to think of them as modern mini doilies too. They’re made using Vinnis Nikkim in Slate, Natural, Baby Pink and Sunshine Yellow. I only made one set of four coasters for each colour to sell in my Etsy shop. They’re available at £6 for a set of four, but I’ll be happy to make you one, or more than four.
I’ve just decided: I’ll make a navy and lime green coaster for me to use at work! That will surely liven up any desk and make tea drinking extra special!

 You can whip this caravan keychain up with scraps of yarn in less than a hour.


 Round 3. Chain 3 (count as DC), *3 DC in 3 chain space, DC in SC. Repeat from * to end. 64 DC. Join with a slip stitch to top of turning chain.


 The nitty gritty of the white baby blanket:


 So how did I do it? It’s dead easy.